Chocolate
Chocolate Bark
The Most Beautiful Chocolate You Can Make in 15 Minutes
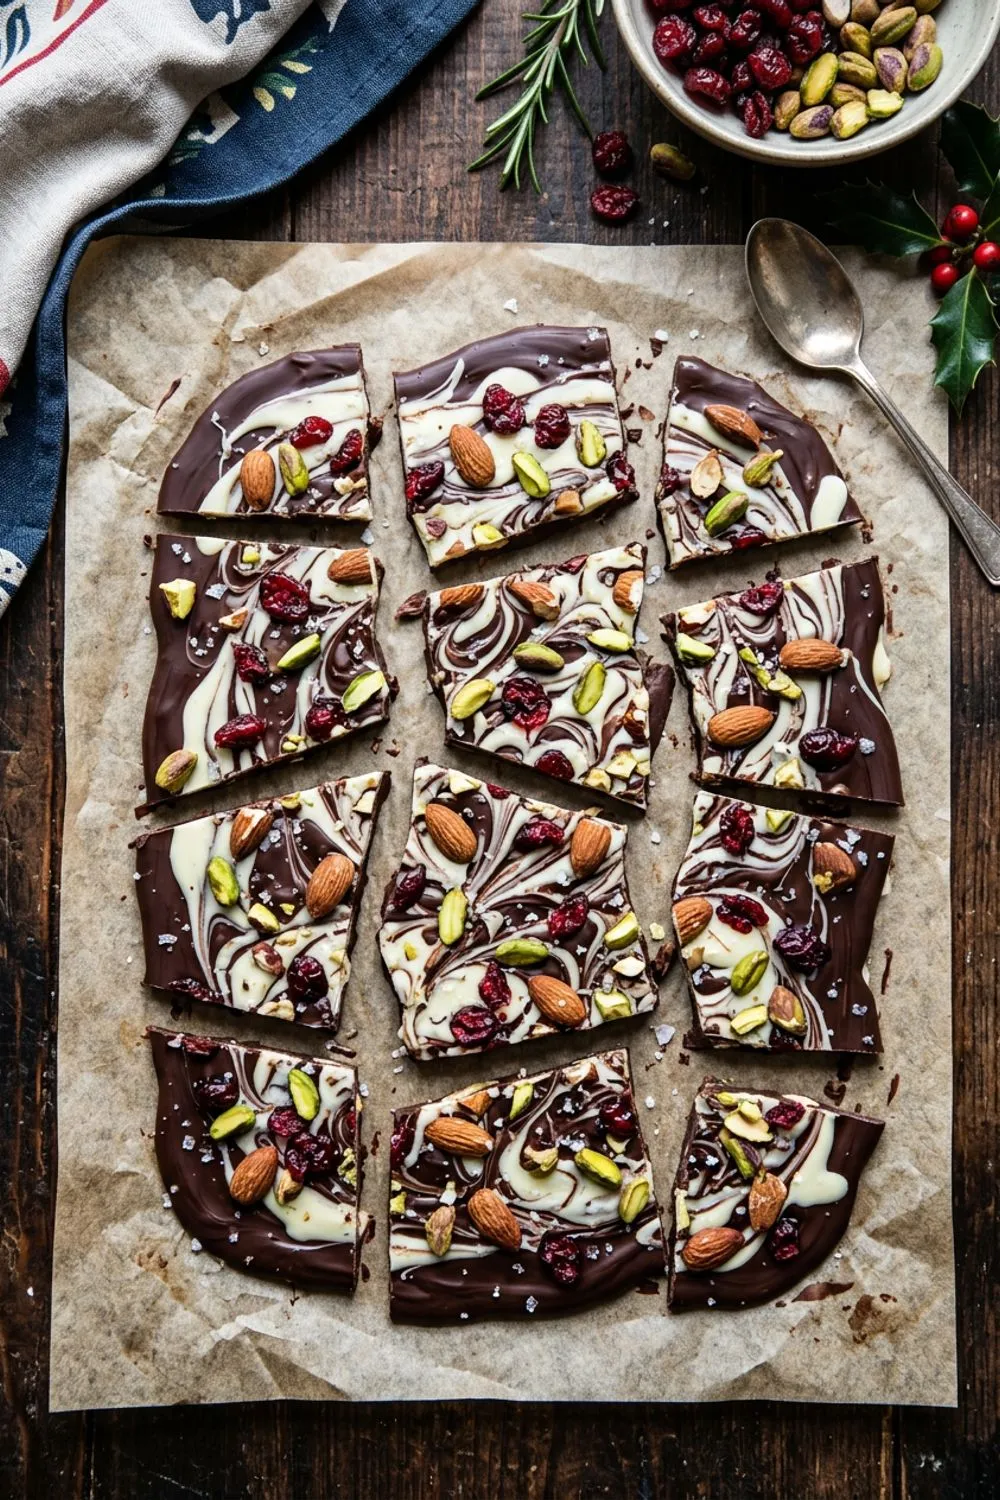
Chocolate bark is proof that impressive does not have to mean difficult. It is, in its purest form, a slab of melted chocolate covered in beautiful things and broken into pieces. There is no baking, no tempering (unless you want to), no precise measurements, and no way to fail. And yet, when you break a piece from a batch of homemade bark — with its swirls of dark and white chocolate, jewel-toned cranberries, emerald pistachios, and golden almonds — it looks like something from the display case of a luxury chocolate shop.
I make chocolate bark constantly. It is my go-to gift during the holidays, my contribution to potlucks when time is short, and my standby when I want something sweet that does not require turning on the oven. A single batch takes about 15 minutes of active time and produces enough for a generous gift or a party platter. The cost is a fraction of what you would pay at a chocolatier, and honestly, homemade bark usually tastes better because you control the quality of the chocolate and the freshness of the toppings. There is also something deeply satisfying about breaking apart a slab of chocolate that you made yourself — the snap, the scattering of toppings, the irregular pieces that look artfully imperfect.
What I love most about bark is its flexibility. The recipe I share below is my favorite combination — dark chocolate with white chocolate swirls, almonds, pistachios, cranberries, and sea salt — but it is really a template. Once you understand the basic technique, you can customize bark endlessly to suit any occasion, preference, or dietary restriction.
Choosing Your Chocolate
The chocolate is the canvas, so choose wisely. For the dark chocolate base, I use something in the 60 to 70 percent cacao range. This provides a rich, slightly bitter foundation that balances the sweetness of the toppings and the white chocolate swirl. Going higher than 70 percent can make the bark taste astringent. Below 60 percent and it starts to taste more sweet than chocolatey.
For the white chocolate swirl, use real white chocolate, not white “coating” or “confectionery coating.” Real white chocolate contains cocoa butter and has a creamy, vanilla-rich flavor. The coatings contain vegetable oils instead and taste waxy and artificial. Check the ingredients list — if it does not list cocoa butter, it is not real white chocolate.
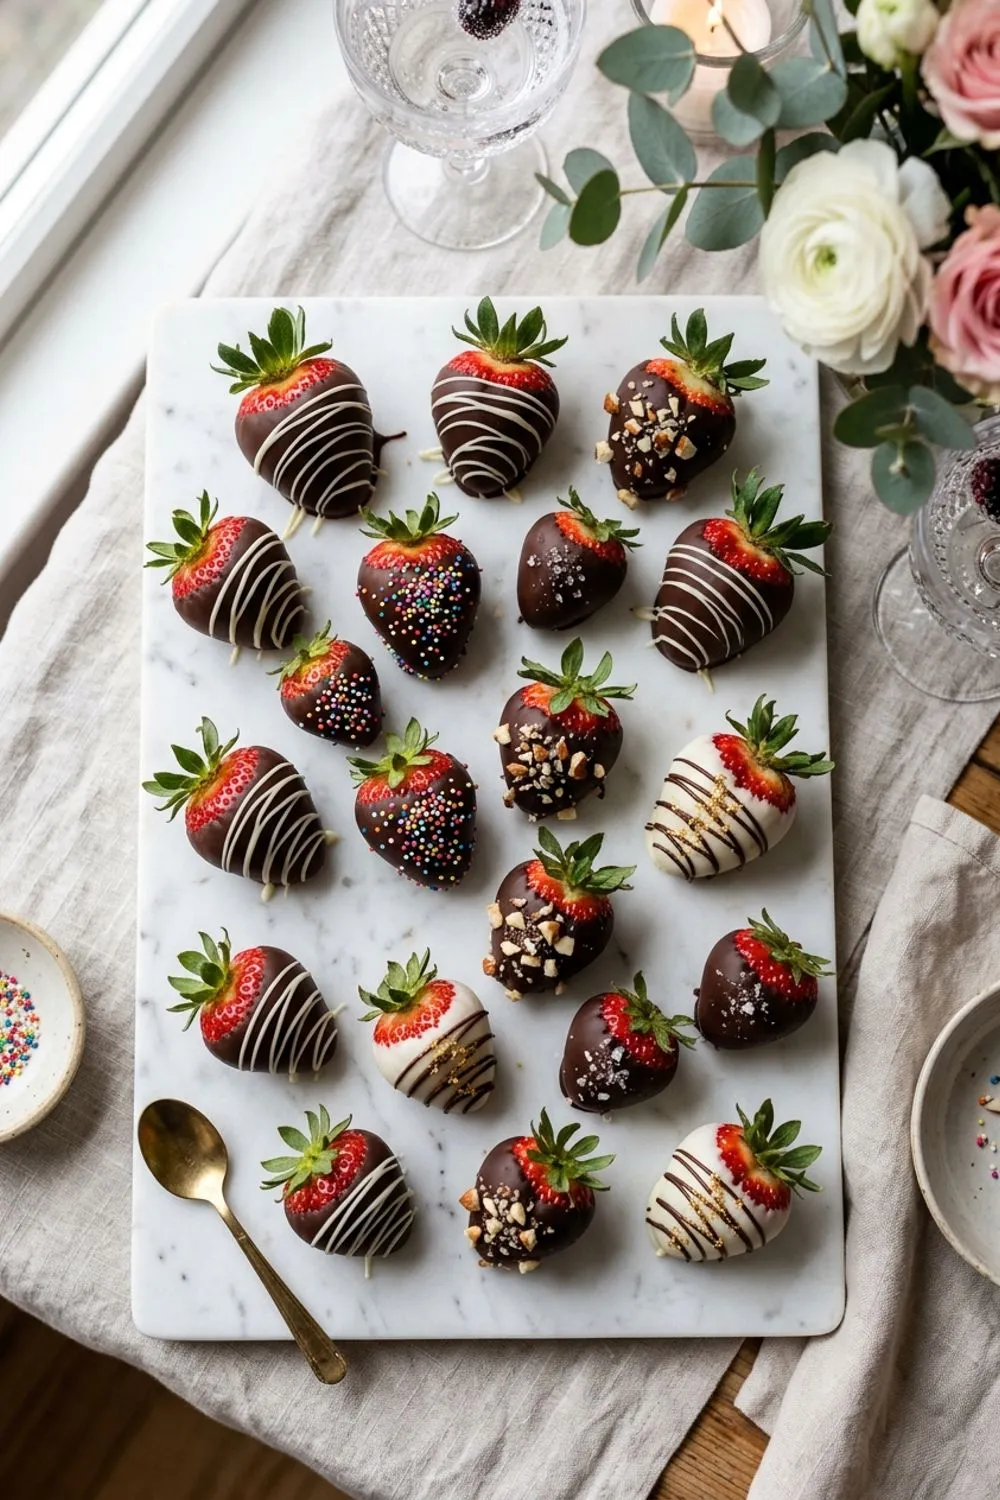
The coconut oil addition serves the same purpose here as it does in my chocolate covered strawberries — it keeps the chocolate fluid for easier spreading and gives the set bark a satisfying snap when broken. One tablespoon per 12 ounces of dark chocolate is the right proportion.
The Topping Combination
Almonds
Roasted almonds provide a sturdy, satisfying crunch and a mild, slightly sweet nuttiness that does not compete with the chocolate. I chop them roughly so you get a mix of large and small pieces, creating varied texture across the bark. Raw almonds work too, but roasted have more flavor depth.
Pistachios
Pistachios serve double duty: their bright green color against the dark chocolate is visually stunning, and their slightly sweet, slightly savory flavor adds complexity. Buy shelled pistachios to save yourself considerable frustration. Lightly toasted pistachios have even more flavor, but raw ones are perfectly fine.
Dried Cranberries
Tart, chewy, and ruby-colored, dried cranberries provide acidity that cuts through the richness of the chocolate and a contrasting texture that makes each bite more interesting. They also add beautiful color that catches the eye and says “holiday” without any additional decoration.
Flaky Sea Salt
The salt is not optional. A light scatter of Maldon or another flaky sea salt over the finished bark transforms it from good to extraordinary. Salt enhances chocolate flavor the same way it enhances every other flavor — it amplifies the sweetness, deepens the bitterness, and makes the whole experience more vivid and satisfying.
Technique Notes
Spreading the Base
When you pour the melted dark chocolate onto the parchment, resist the urge to make it perfectly rectangular or uniformly thick. The rustic, irregular edges of the bark are part of its charm and signal that it is handmade. An offset spatula gives you the most control, but a regular spatula or even the back of a spoon works fine.
Aim for about 1/4 inch thick. Use the back of the spatula to spread from the center outward. If the chocolate starts to set before you have finished spreading, it has cooled too much — work more quickly next time or keep the chocolate slightly warmer.
The Swirl Technique
The marbled effect is what makes this bark look professional, and it is remarkably easy to create. Drizzle the melted white chocolate over the dark chocolate in thin lines, dollops, or a random pattern — it does not matter because you are about to swirl it.
Take a toothpick, skewer, or the tip of a small knife and drag it through the white chocolate in gentle, S-shaped or circular motions. Three to four passes is enough. The temptation is to keep swirling until you get a “perfect” pattern, but too much swirling blends the colors into a muddy brown. Stop while you can still see clear contrast between the dark and white chocolate.
Pressing in the Toppings
Scatter the toppings while the chocolate is still wet and press any large pieces gently into the surface. If the toppings are just sitting on top without being embedded, they will fall off when the bark is broken. But do not press so hard that you push them through the chocolate layer, which looks messy and compromises the structure.
Seasonal Variations
Holiday Peppermint Bark
Use white chocolate as the base layer instead of dark. Spread it onto the parchment, let it set, then spread a layer of dark chocolate on top. While the dark layer is wet, sprinkle with crushed candy canes. The red and white stripes against the dark chocolate look festive and the peppermint flavor is pure holiday magic. This is one of my all-time favorite Christmas treats.
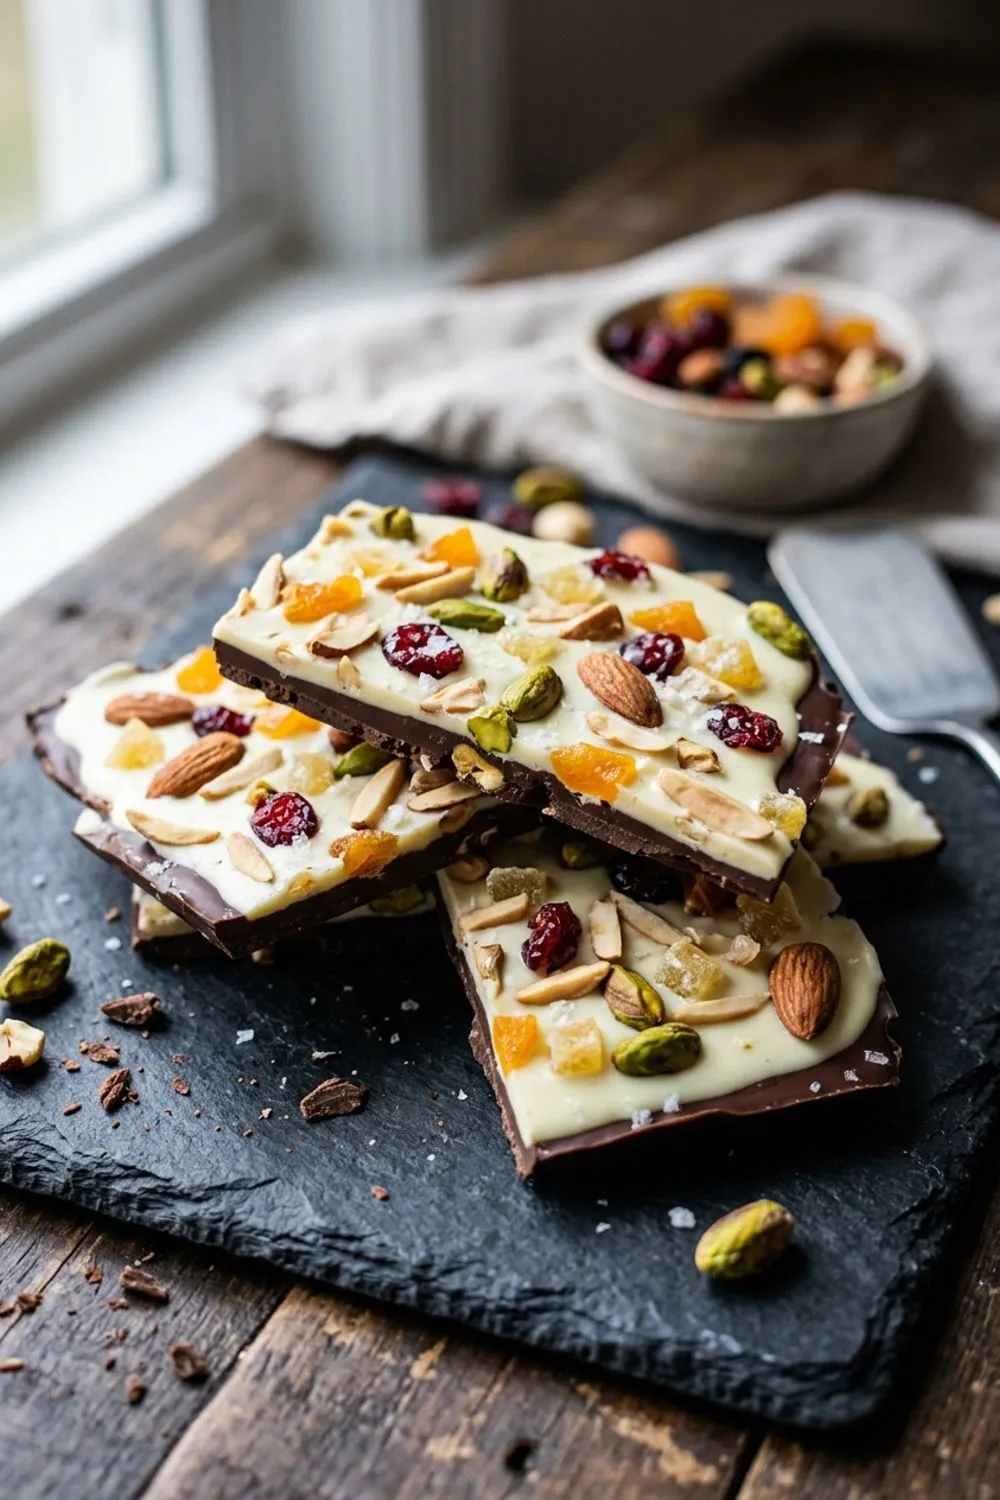
Tropical Bark
Use milk chocolate as the base. Top with toasted coconut flakes, chopped macadamia nuts, dried mango pieces, and a drizzle of white chocolate. This version tastes like vacation and is perfect for summer gifting.
Trail Mix Bark
Dark chocolate base topped with roasted peanuts, sunflower seeds, raisins, mini pretzel pieces, and M&Ms. This is the bark for kids’ parties and casual gatherings — fun, colorful, and impossible to stop eating.
Espresso Bark
Sprinkle whole roasted coffee beans and cocoa nibs over the dark chocolate base. Drizzle with white chocolate and finish with a light dusting of espresso powder. This is bark for serious chocolate and coffee lovers.
The Art of Topping Combinations
The beauty of chocolate bark lies in the interplay between chocolate and toppings. A well-chosen combination creates a symphony of flavors and textures — crunchy, chewy, sweet, salty, bitter, and tart all in a single bite. Here are the principles I follow when designing a new bark:
Contrast in texture. Every bark should include something crunchy (nuts, pretzels, brittle) and something chewy (dried fruit, marshmallows, caramel). This variety keeps each bite interesting and prevents the monotony of a single texture throughout.
Contrast in flavor. Sweet chocolate benefits from something tart (dried cranberries, freeze-dried raspberries) and something salty (sea salt, pretzels, salted nuts). Tart and salty additions make the chocolate taste more chocolatey by providing a foil that your palate can reference.
Contrast in color. Visual appeal drives the first impression, and bark should be beautiful before anyone takes a bite. The combination of red cranberries, green pistachios, and golden almonds against dark chocolate is not accidental — those colors create a vibrant, appetizing display that catches the eye and communicates quality.
Restraint in quantity. It is tempting to pile on every topping in the pantry, but the best bark exercises restraint. Three to four toppings plus salt is the sweet spot. More than that and the bark becomes cluttered, both visually and in flavor. Each topping should be identifiable and intentional.
Size matters. Large pieces of topping create more visual impact and more varied eating experiences than uniformly small pieces. I like a mix — some roughly chopped nuts for drama and some smaller pieces that embed more fully into the chocolate.
Making Bark Look Professional
Use high-quality toppings. Bright, colorful toppings with varied textures make bark look expensive and intentional. A mix of colors (green pistachios, red cranberries, golden almonds) creates visual appeal that monochrome toppings cannot match.
Break, do not cut. The irregular, jagged edges of broken bark look artisan and handcrafted. Cutting bark into neat squares makes it look commercial and generic. To break bark cleanly, use your hands and snap it along natural fault lines.
Layer pieces for display. When arranging bark on a platter, overlap the pieces slightly and stack them at varying angles. This creates height and visual interest. Scatter a few extra nuts and cranberries around the edges for a styled, editorial look.
Package in clear bags. If gifting, place bark pieces in clear cellophane bags so the beautiful chocolate and toppings are visible. Tie with ribbon and attach a tag. This looks high-end and requires no special packaging equipment.
Storage
At room temperature: Store in an airtight container in a cool, dry place for up to 2 to 3 weeks. If your kitchen is warm, the chocolate may soften. Layer pieces between sheets of wax paper to prevent them from sticking together.
In the refrigerator: Store for up to 1 month. The bark will be firm and snappy straight from the fridge. Let it warm for 5 minutes before serving for the best flavor.
In the freezer: Wrap the container well and freeze for up to 3 months. Thaw in the refrigerator overnight.
Avoiding bloom during storage. Chocolate bloom — those white streaks that sometimes appear on the surface — is caused by temperature fluctuations that allow cocoa butter to migrate and recrystallize on the surface. To prevent it, store bark at a consistent temperature and avoid moving it between warm and cold environments. If bloom does occur, the bark is still perfectly safe and delicious — it is purely cosmetic. The coconut oil in this recipe helps minimize bloom by stabilizing the cocoa butter crystals.
Tempering vs. Not Tempering
Tempering chocolate — the process of carefully heating and cooling it to align the cocoa butter crystals — produces bark with a professional snap, glossy sheen, and resistance to bloom. It is the technique professional chocolatiers use, and the results are undeniably superior in both appearance and texture.
However, tempering is a skill that takes practice and requires a thermometer and careful attention. For home bakers making bark as a casual treat or gift, the coconut oil method produces excellent results without any of the fuss. The coconut oil acts as a shortcut tempering agent — it encourages the cocoa butter to set in a semi-crystalline state that is firm, snappy, and glossy enough to look polished.
If you want to experiment with tempering, the simplest method is called “seeding.” Melt two-thirds of your chopped chocolate to about 115°F (46°C), remove from heat, and stir in the remaining one-third (this is the “seed”) until all the chocolate is melted and the temperature drops to about 88°F (31°C) for dark chocolate. The seed chocolate contains pre-formed crystals that template the rest of the chocolate as it cools, producing a tight crystal structure.
Tempered bark looks notably more professional — it has a high-gloss surface and breaks with an audible snap rather than bending. If you plan to sell bark or give it as a high-end gift, tempering is worth learning. For everyday enjoyment, the coconut oil approach is perfectly wonderful.
Why Bark Is the Perfect Entry Point
If you have never worked with melted chocolate before, bark is where to start. It is forgiving, requires no precision, and produces results that look and taste impressive regardless of your skill level. The worst that can happen is that your swirl is not as defined as you wanted or your toppings are not perfectly distributed — and nobody will notice because they will be too busy eating it.
From here, you can graduate to chocolate truffles and chocolate ganache, which use similar techniques with slightly more finesse. But bark will always be in my rotation for its unbeatable combination of beauty, flavor, and simplicity.
There is also a meditative quality to making bark that I genuinely enjoy. The process is calm and unhurried — melting chocolate, spreading it across parchment, arranging beautiful toppings, and waiting for it to set. It is the kind of kitchen activity that slows you down in a good way, and the result is a gift from your hands and your attention that communicates care far beyond its simple ingredients. In a world of increasingly complicated recipes and techniques, sometimes the simplest preparations are the most meaningful.
Never Miss a Sweet Recipe
Join 5,000+ home bakers and get new recipes straight to your inbox.
Ingredients
Dark Chocolate Layer
White Chocolate Swirl
Toppings
Instructions
- 1
Prepare Your Surface
Line a large rimmed baking sheet with parchment paper or a silicone baking mat. Have all your toppings measured and ready in small bowls within easy reach — once the chocolate is spread, you need to work quickly before it sets.
- 2
Melt the Dark Chocolate
Combine the chopped dark chocolate and 1 tablespoon coconut oil in a microwave-safe bowl. Microwave in 30-second intervals, stirring after each, until completely smooth and glossy — usually 3 to 4 intervals. Alternatively, melt over a double boiler. The chocolate should be fluid and warm but not hot.
- 3
Spread the Base Layer
Pour the melted dark chocolate onto the prepared baking sheet. Using an offset spatula, spread it into a roughly 10x14-inch rectangle, about 1/4 inch thick. The edges can be rustic and uneven — this adds character to the finished bark.
- 4
Add the White Chocolate Swirl
Melt the white chocolate with 1 teaspoon coconut oil using the same microwave method. Drizzle it in lines or dollops over the dark chocolate layer. Using a toothpick or the tip of a knife, swirl the white chocolate into the dark in a decorative marble pattern. Do not over-swirl — 3 to 4 passes is enough. You want distinct, visible contrast.
- 5
Add the Toppings
While the chocolate is still wet, scatter the chopped almonds, pistachios, and dried cranberries evenly over the surface. Gently press the larger pieces into the chocolate so they adhere. Finish with a sprinkle of flaky sea salt over the entire surface.
- 6
Set and Break Into Pieces
Let the bark set at room temperature for about 1 hour, or refrigerate for 20–30 minutes until completely firm. Once set, break or cut the bark into irregular pieces of varying sizes. The rustic, jagged edges are part of the charm.
Nutrition Information
Per serving (serves 20). Values are approximate.
| Calories | 140 calories |
| Total Fat | 9g |
| Saturated Fat | 5g |
| Carbohydrates | 14g |
| Sugar | 11g |
| Protein | 2g |
| Sodium | 40mg |
| Fiber | 1g |
* Percent Daily Values are based on a 2,000 calorie diet. Your daily values may be higher or lower depending on your calorie needs. Nutritional information is an estimate and may vary.
Frequently Asked Questions
Why did my white chocolate seize when melting?
White chocolate is more temperamental than dark chocolate because it has a higher sugar content and lower cocoa butter content. Use lower microwave power (50%) and shorter intervals (20 seconds). Even a tiny drop of water will cause it to seize. If it does seize, add 1 teaspoon of coconut oil and stir vigorously.
Can I use milk chocolate instead of dark?
Absolutely. Milk chocolate creates a sweeter, milder bark. The contrast with white chocolate will be less dramatic visually, but the flavor is wonderful. You can also use all dark, all milk, or all white — the toppings provide variety regardless.
How thick should the bark be?
About 1/4 inch is ideal — thick enough to snap satisfyingly but thin enough to eat comfortably. Thinner bark is more delicate and elegant. Thicker bark is more substantial and candy-like.
How long does chocolate bark keep?
In an airtight container at cool room temperature, bark keeps for 2 to 3 weeks. In the refrigerator, up to 1 month. In the freezer, up to 3 months. The dried cranberries may soften slightly over time.

Reader Reviews
Based on 178 reviews