Cakes & Cupcakes
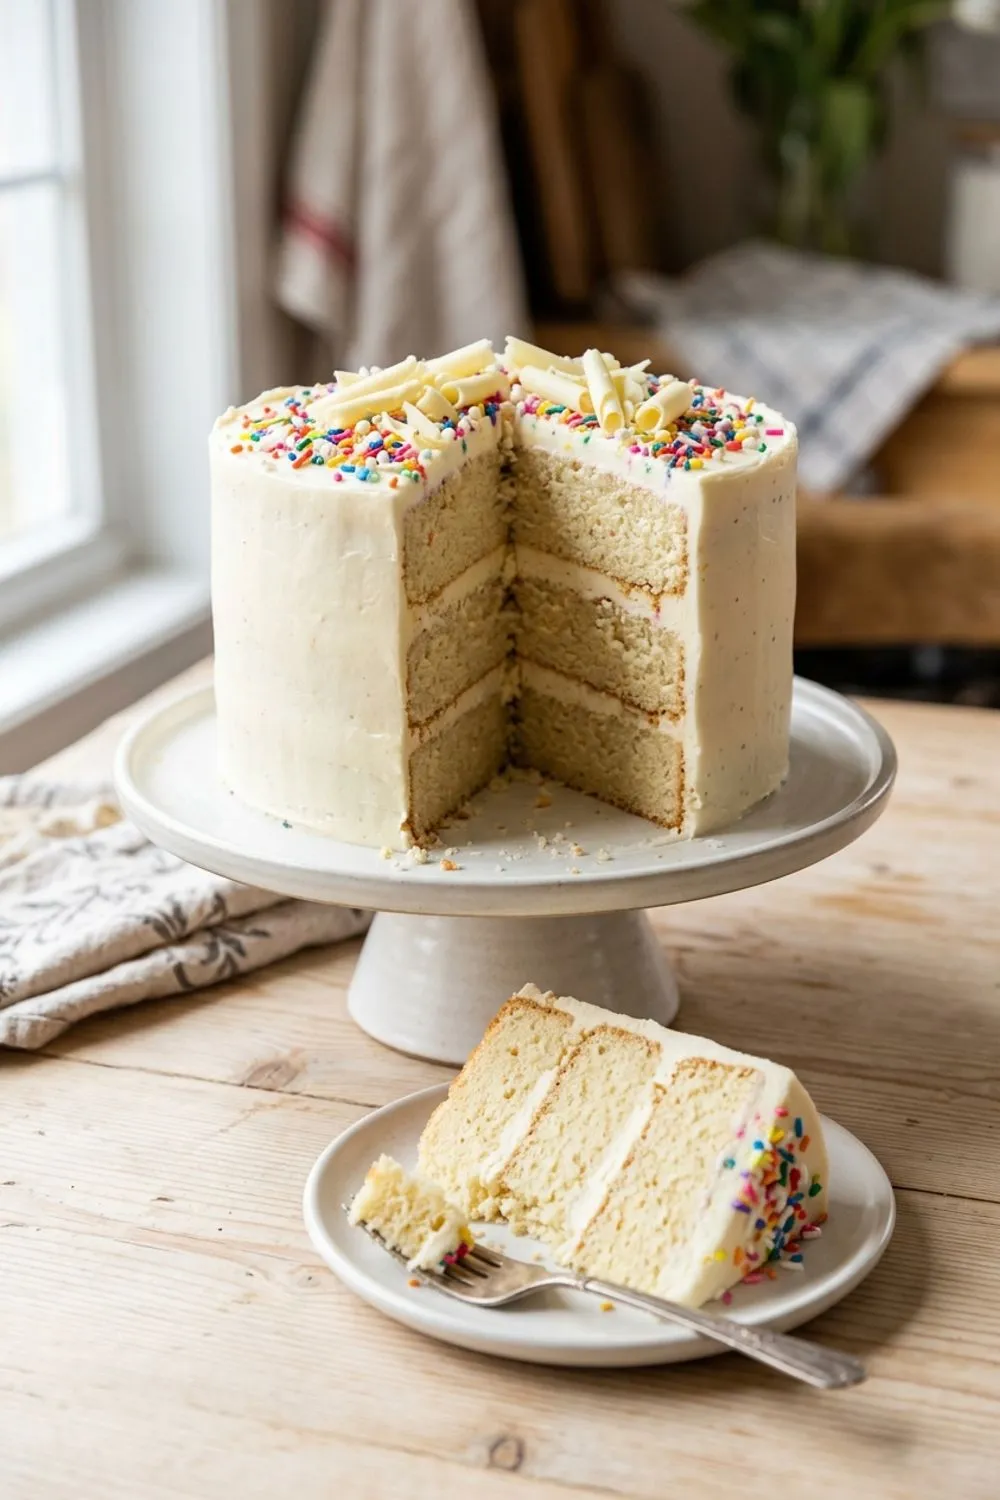
Classic Vanilla Layer Cake
The Cake That Started It All
Every baker has a recipe that anchors their entire collection — the one that gets requested for every birthday, every celebration, every occasion where a cake simply has to be perfect. For me, that recipe is this vanilla layer cake. It is the first serious cake I ever learned to make, and after years of tinkering, adjusting, and testing on every willing friend and family member I could find, it has become something I am genuinely proud to share.
A great vanilla cake is deceptively difficult. Chocolate cake has cocoa and melted chocolate to cover up imperfections. Carrot cake has spices and shredded carrots adding moisture and flavor. But vanilla cake has nowhere to hide. Every flaw in texture, every imbalance in sweetness, every degree of over-baking shows up immediately. To make a vanilla cake that people remember, you need to nail the fundamentals.
This recipe does exactly that. The crumb is impossibly tender — the kind that tears apart in soft, feathery shreds rather than crumbling into dry pieces. The flavor is pure vanilla, warm and fragrant, with just enough sweetness to satisfy without becoming cloying. And the buttercream is silky, smooth, and so perfectly vanilla-scented that it tastes like the world’s best vanilla ice cream in frosting form.
It is, in the most literal sense, a classic. And every home baker deserves a classic this good.
Why Cake Flour Changes Everything
The single most important ingredient decision in this recipe is using cake flour instead of all-purpose. They might look similar sitting in their bags on the shelf, but they behave very differently in a cake batter.
Cake flour is milled from soft wheat, which gives it a lower protein content — about 7-8% compared to all-purpose flour’s 10-12%. Protein in flour creates gluten when mixed with liquid, and gluten is what gives baked goods their structure and chew. In bread, you want lots of gluten. In cake, you want as little as possible.
Less gluten means a more tender, delicate crumb. Cake flour also absorbs less liquid than all-purpose, which keeps the batter lighter and more airy. And it is more finely milled, which means it disperses more evenly and creates a smoother texture.
The difference between a cake made with cake flour and one made with all-purpose is not subtle. It is immediately apparent in the first bite. The cake flour version is velvety and soft, almost cloud-like. The all-purpose version is pleasant but noticeably sturdier and denser. For a celebration cake that needs to wow, cake flour is the right choice.
If you cannot find cake flour, you can make a reasonable substitute. For every cup of cake flour needed, measure one cup of all-purpose flour, remove two tablespoons, and replace them with two tablespoons of cornstarch. Sift the mixture three times. It will not be identical to true cake flour, but it gets you close.
The Reverse Creaming Method
Most cake recipes use the traditional creaming method — beat butter and sugar together, add eggs, alternate dry and wet ingredients. It works, and it has worked for generations. But for this cake, I use the reverse creaming method, and the difference is remarkable.
In reverse creaming, you start by mixing the butter directly into the dry ingredients. The butter coats the flour particles in fat before any liquid is introduced. This coating prevents excess gluten development, which results in an extraordinarily tender crumb. It also creates a finer, more uniform texture because the fat is distributed more evenly throughout the flour.
The technique is straightforward. Whisk your dry ingredients together, then add room temperature butter and mix on low speed until the mixture looks like coarse, damp sand. This is the butter coating the flour. Then you add the liquid ingredients in stages, beating at medium speed between additions to build just enough structure to hold the cake together.
The result is a cake that is noticeably more tender and velvety than one made with traditional creaming. It also rises more evenly, which means less doming and easier leveling later. Professional bakers have used this method for decades, and once you try it, you will understand why.

Room Temperature — The Rule That Matters Most
Every ingredient in this recipe should be at room temperature before you begin. I know it is annoying. I know it requires planning ahead. But it genuinely makes the difference between a good cake and a great one.
Room temperature butter creams more smoothly and incorporates into the flour more evenly. Room temperature eggs emulsify better with the butter and create a more stable batter. Room temperature milk blends in seamlessly without shocking the butter into seizing up and creating a curdled-looking mess.
When cold ingredients hit warm butter, the butter hardens around them in tiny lumps. These lumps mean uneven distribution of fat, which means uneven texture in the finished cake. Some bites will be tender while others are denser. Room temperature ingredients eliminate this problem entirely.
To bring eggs to room temperature quickly, place them in a bowl of warm (not hot) water for 10 minutes. For milk, microwave it for 15-20 seconds. For butter, cut it into cubes and let it sit on the counter for 30-45 minutes. It should be soft enough to dent with a finger but not greasy or collapsing.
Baking Even Layers
Nothing is more frustrating than spending time on a perfect batter only to pull domed, lopsided cake layers from the oven. Here are the techniques I use to get flat, even layers every single time.
First, divide the batter by weight, not by eye. A kitchen scale takes the guesswork out of it completely. Weigh the total batter in the bowl, divide by three, and portion accordingly. Each pan should get the same amount, down to the ounce. Uneven layers look uneven after assembly, no matter how much frosting you use to compensate.
Second, use damp cake strips around the outside of each pan. You can buy commercial ones or make your own by cutting old kitchen towels into strips, soaking them in water, wringing them out, and wrapping them around the pans secured with safety pins or foil. The moisture keeps the edges of the batter cooler, which means the edges do not set before the center, which means the center does not dome upward. It sounds like a fussy step, but it is the single most effective trick for flat cake layers.
Third, tap each filled pan firmly on the counter twice before placing it in the oven. This settles the batter, pops any large air bubbles, and gives you a more even surface to start with.
Fourth, do not open the oven door for the first 20 minutes of baking. The sudden temperature drop can cause the cake to sink in the center.
Making Buttercream That Actually Tastes Good
Buttercream has a reputation problem. Too many people have tasted the overly sweet, grainy, artificially flavored version that comes on grocery store cakes, and they assume all buttercream is like that. This buttercream is nothing like that.
The secret is threefold. First, use real butter — lots of it. The butter provides richness, flavor, and a creamy texture that no amount of shortening can replicate. Second, sift the powdered sugar thoroughly to eliminate every last lump. Unsifted sugar is the primary cause of grainy frosting. Third, beat the finished buttercream on high speed for a full three to five minutes. This whips air into the frosting, making it lighter, fluffier, and smoother.
The heavy cream is what takes the frosting from stiff and dense to silky and spreadable. Add it one tablespoon at a time until you reach the consistency you want — stiffer for piping, softer for spreading. On a warm day, you might use less cream. On a cool day, you might use more.
And please, use good vanilla extract. Not imitation, not vanilla-flavored anything. Pure vanilla extract or, even better, vanilla bean paste with those gorgeous little specks. The frosting is essentially flavored butter, and the vanilla is doing almost all of the flavoring. It deserves the best you can give it.
The Crumb Coat Secret
Professional cakes always look impossibly smooth, as if the frosting was applied by machine. The secret is a technique called the crumb coat, and it is much simpler than it looks.
A crumb coat is a very thin, initial layer of frosting applied to the entire cake. Its job is to trap any loose crumbs in a seal of buttercream so they do not show up in the final coat. Think of it as primer before paint.
Apply a thin layer of frosting to the top and sides of the assembled cake — you should be able to see the cake through the frosting. It does not need to be pretty. Refrigerate the cake for 15 minutes, which firms up the crumb coat and gives you a smooth, crumb-free surface to work on.
Then apply the final coat of frosting. Because the crumb coat is holding all the loose crumbs in place, you can spread the final coat smoothly and confidently without worrying about bits of cake mixing into your pristine white frosting. Use an offset spatula and a cake turntable for the smoothest results.
Assembly Tips for a Stunning Cake
The assembly is where your cake goes from a collection of components to a showpiece. Take your time with this part — it is the home stretch, and a little patience here pays off enormously.
Start by leveling each cake layer with a serrated knife. Even with all the tricks for preventing doming, most cakes will have a slight crown. Trim them flat so the layers stack evenly. Place the first layer cut-side up on your cake board or plate. This gives the frosting a slightly rough surface to grip onto.
Spread an even layer of frosting — about 3/4 cup — over the first layer. Use an offset spatula to push the frosting all the way to the edges. Place the second layer on top and press down gently. Repeat with more frosting, then add the third layer top-side down. This gives you the flattest possible surface on top of the cake.
For the smoothest sides, hold a bench scraper or offset spatula vertically against the side of the cake while slowly turning the turntable. The frosting will smooth out into an even surface with practice. Do not worry if it is not perfect the first time — even experienced bakers need a few cakes to develop the muscle memory.
Storing and Serving
A frosted vanilla cake can sit at room temperature for up to two days if your kitchen stays below 70 degrees. In warmer weather, refrigerate the cake but bring it to room temperature for 30-60 minutes before serving. Cold buttercream is firm and waxy — you want it soft and creamy when your guests take their first bite.
Unfrosted layers can be wrapped tightly in plastic wrap and refrigerated for up to 3 days, or frozen for up to 3 months. Thaw frozen layers in the refrigerator overnight before frosting. Buttercream can also be made ahead and refrigerated for up to a week. Bring it to room temperature and re-whip before using.
To cut clean slices, use a long, sharp, non-serrated knife. Run it under hot water and wipe dry between each cut. This melts through the frosting cleanly rather than dragging it through the layers.
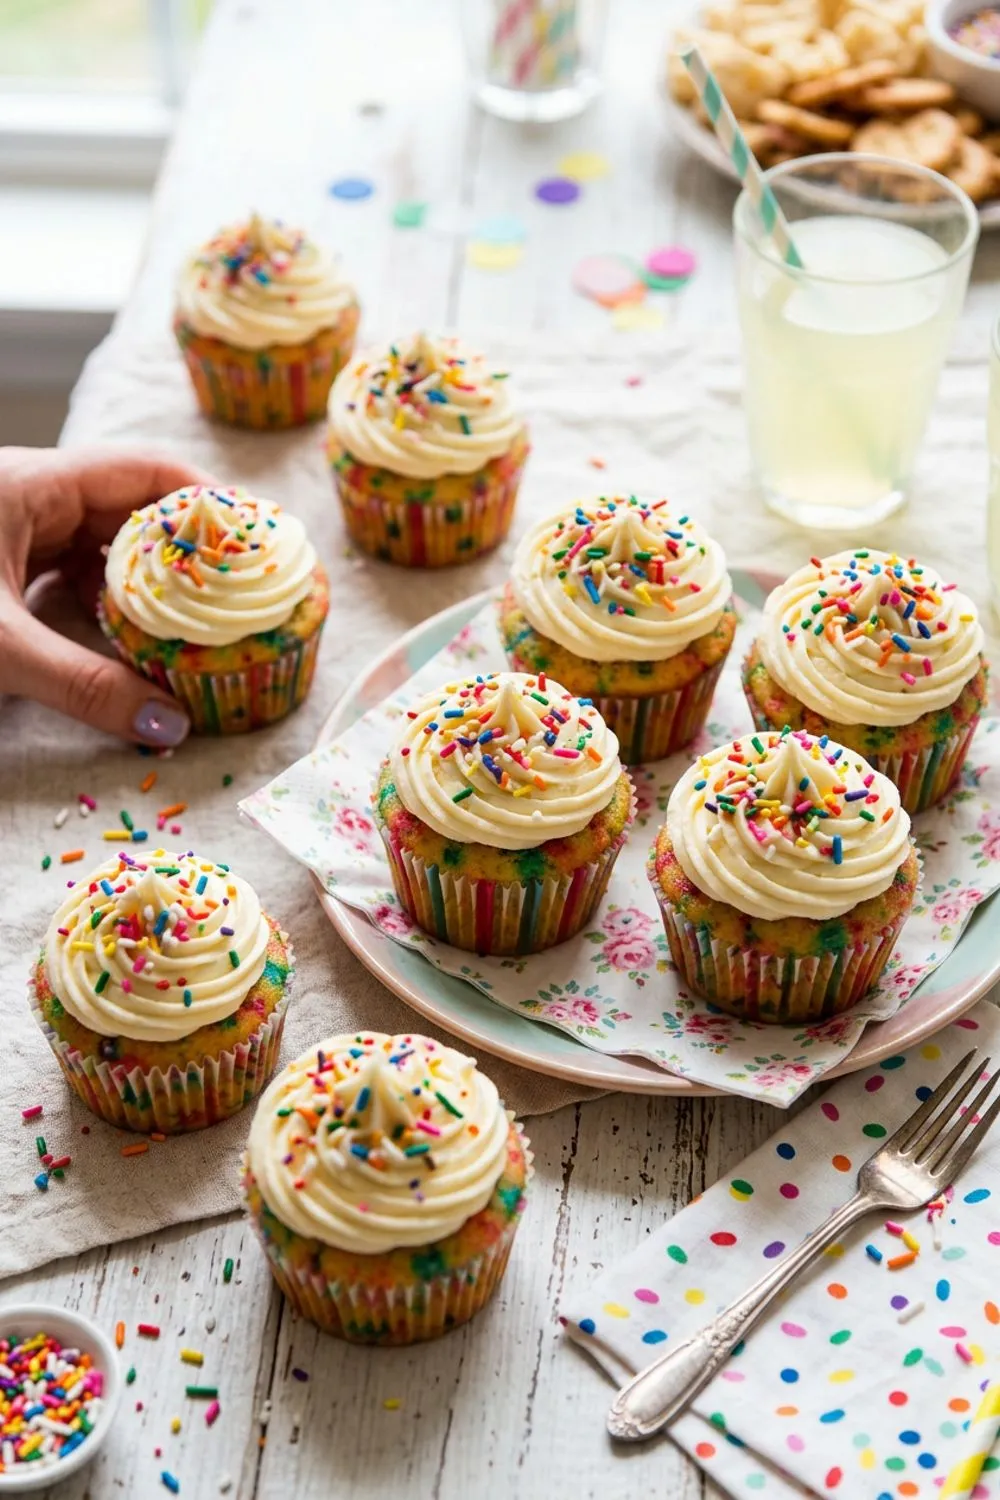
For something lighter, try my funfetti cupcakes which use a similar vanilla base in cupcake form. Or for a completely different but equally impressive celebration cake, check out my red velvet cupcakes with their tangy cream cheese frosting.
Flavor Variations on a Classic Base
Once you have mastered this vanilla cake, you have a canvas for dozens of variations without learning a new recipe from scratch.
Lemon Cake: Add 2 tablespoons of finely grated lemon zest to the dry ingredients and substitute 1/4 cup of the milk with fresh lemon juice. The citrus brightens the vanilla base beautifully and makes a stunning spring or summer celebration cake. Pair with lemon buttercream made by adding 2 tablespoons lemon juice and 1 tablespoon zest to the frosting recipe.
Almond Cake: Replace the vanilla extract with 1-1/2 teaspoons almond extract in both the cake and the frosting. The almond flavor is more delicate and floral than vanilla, and it pairs wonderfully with raspberry jam between the layers.
Confetti Cake: Fold 1/3 cup rainbow sprinkles into the finished batter just before dividing among pans. Use jimmies, not nonpareils — nonpareils bleed color into the batter and turn it gray. This is the ultimate birthday cake for kids and adults alike.
Strawberry Cake: Fold 1 cup of finely diced fresh strawberries into the batter and add 2 tablespoons strawberry jam. Reduce the milk by 2 tablespoons to account for the moisture from the berries. The fresh fruit creates pockets of berry flavor throughout each slice.
This is the cake people will remember. The one they will ask you to make again and again. And every single time, it will be worth the effort.
Never Miss a Sweet Recipe
Join 5,000+ home bakers and get new recipes straight to your inbox.
Ingredients
Vanilla cake
Vanilla buttercream
Instructions
- 1
Prepare the pans and dry ingredients
Preheat your oven to 350°F (175°C). Grease three 8-inch round cake pans, line the bottoms with parchment paper circles, then grease and flour the parchment and sides. In a large bowl, whisk together the sifted cake flour, sugar, baking powder, and salt until well combined.
- 2
Mix using the reverse creaming method
Add the room temperature butter to the dry ingredients and mix on low speed until the mixture resembles coarse, damp sand — about 2 minutes. In a separate measuring cup, whisk together the egg whites, whole eggs, milk, oil, and vanilla. Add half of the wet mixture to the sandy flour mixture and beat on medium speed for 2 minutes to build structure. Scrape the bowl, then add the remaining wet mixture in two additions, beating for 30 seconds after each.
- 3
Divide and bake
Divide the batter evenly among the three prepared pans — a kitchen scale helps here, aiming for about 14-15 ounces per pan. Smooth the tops with an offset spatula. Bake for 24-28 minutes, until the tops spring back when lightly pressed and a toothpick inserted in the center comes out clean. Do not overbake.
- 4
Cool the layers
Let the cakes cool in their pans on wire racks for 10 minutes. Run a thin knife around the edges, then invert onto the racks. Peel off the parchment paper and let cool completely — at least 1 hour. The layers must be completely cool before frosting, or the buttercream will melt.
- 5
Make the vanilla buttercream
Beat the room temperature butter on medium-high speed for 5 minutes until very pale and fluffy. Add the sifted powdered sugar one cup at a time, beating on low after each addition. Add the vanilla extract and salt. Increase speed to medium-high and beat for 3 minutes. Add heavy cream one tablespoon at a time until you reach a smooth, spreadable consistency.
- 6
Level the cake layers
Using a long serrated knife or a cake leveler, trim the domed tops off each layer to create flat, even surfaces. Save the scraps for snacking or cake pops. Place the first layer on a cake board or serving plate, cut-side up.
- 7
Assemble and frost
Spread about 3/4 cup buttercream over the first layer in an even coating. Place the second layer on top and repeat. Add the third layer, top-side down for the flattest surface. Apply a thin crumb coat of frosting over the entire cake and refrigerate for 15 minutes. Then apply the final coat of frosting, using an offset spatula to smooth the sides and top. Decorate with swirls, rosettes, or sprinkles as desired.
Nutrition Information
Per serving (serves 12). Values are approximate.
| Calories | 380 calories |
| Total Fat | 18g |
| Saturated Fat | 11g |
| Carbohydrates | 52g |
| Sugar | 40g |
| Protein | 4g |
| Sodium | 190mg |
| Fiber | 0g |
* Percent Daily Values are based on a 2,000 calorie diet. Your daily values may be higher or lower depending on your calorie needs. Nutritional information is an estimate and may vary.
Frequently Asked Questions
Can I use all-purpose flour instead of cake flour?
You can make a substitute by measuring 2-1/2 cups all-purpose flour, removing 5 tablespoons, and replacing them with 5 tablespoons cornstarch. Sift the mixture three times. The texture will be very close to cake flour, though true cake flour will still yield a slightly more tender crumb.
How do I prevent my cake layers from doming?
Doming happens because the edges of the batter set before the center, forcing it to rise upward. To minimize this, wrap the outside of each pan with dampened cake strips (or make your own from strips of damp towel secured with foil). Lower your oven temperature by 25°F and bake a few minutes longer. These steps promote more even rising.
How do I level cake layers properly?
Let the layers cool completely. Place one layer on a flat surface and hold a long serrated knife horizontally at the height where you want to cut. Rotate the cake slowly while keeping the knife steady, letting the blade do the work. A cake turntable makes this much easier. Alternatively, invest in an adjustable cake leveler for perfectly even cuts every time.
Why is my buttercream grainy?
Grainy buttercream almost always means the powdered sugar was not sifted. Always sift before adding, as lumps will not fully dissolve during mixing. Also ensure the butter is at proper room temperature — cold butter does not emulsify smoothly with the sugar. If your frosting is already grainy, beat it on high speed for an additional 5 minutes and add a splash of cream.

Reader Reviews
Based on 287 reviews