Chocolate
Old-Fashioned Chocolate Fudge
The Fudge That Disappears First at Every Gathering
I have a theory about fudge. It is one of those foods that everyone loves but almost nobody makes at home. People buy it at candy shops, receive it in holiday gift boxes, and eat it happily — but the idea of making it from scratch feels daunting, like something that requires a candy thermometer and a degree in food science. And for traditional stovetop fudge, that reputation is somewhat deserved. Old-school fudge recipes involve boiling sugar syrup to precisely the right temperature, then beating it at exactly the right moment during cooling, and if you miss the window by a few degrees or a few seconds, you end up with either a pan of chocolate soup or a block of chocolate concrete.
This recipe throws all of that out the window. It uses the condensed milk method, which I consider the greatest shortcut in candy making. Sweetened condensed milk already contains the sugar in a form that will not crystallize, already has the smooth, creamy base texture you want in fudge, and combines with melted chocolate to create a confection that is virtually indistinguishable from fudge made the hard way. The entire active process takes about 10 minutes. There is no thermometer, no soft-ball stage, no beating window to miss.
I make this fudge every holiday season, and it has become one of my most popular gifts. Wrapped in cellophane and tucked into small boxes, it looks like something from an artisan candy shop. The texture is dense but creamy, with a clean chocolate flavor that dissolves slowly on the tongue. It is the kind of treat that makes people close their eyes for a moment, and that is exactly what good fudge should do.
Why This Method Works
Sweetened Condensed Milk as a Cheat Code
Traditional fudge relies on cooking a sugar syrup to the “soft ball” stage — between 235°F and 240°F (113°C to 116°C). At this temperature, the sugar solution is concentrated enough to set into a firm but tender candy as it cools. Miss this temperature by even 5 degrees and the result changes dramatically. Below soft ball, the fudge stays soft and never sets. Above it, the fudge is hard and crumbly.
Sweetened condensed milk sidesteps this entirely. The milk has already been cooked down with sugar to a thick, syrupy consistency. When combined with melted chocolate and butter, it creates a mixture that sets to the perfect fudge texture without any temperature monitoring whatsoever. The sugar in the condensed milk is in an amorphous state that resists crystallization, which is why this method produces reliably smooth, creamy fudge every single time.
The Right Chocolate
Semi-sweet chocolate chips are my go-to for this recipe. They melt evenly, have a balanced flavor that is sweet without being cloying, and are available everywhere. Using good-quality chocolate makes a noticeable difference — brands like Ghirardelli, Guittard, and Trader Joe’s produce noticeably smoother fudge than generic brands.
You can also use chopped chocolate bars, which I actually prefer when making fudge for gifts. Bar chocolate typically has a higher cocoa butter content than chips, which produces a silkier, more luxurious texture. Chop it into small, uniform pieces for even melting.
Butter Makes It Better
Four tablespoons of butter may seem modest, but in fudge, butter serves a specific purpose beyond flavor. It adds richness and mouthfeel, coating the palate in a way that chocolate and sugar alone cannot. It also contributes to the smooth, creamy texture by lubricating the sugar crystals that form as the fudge sets, preventing them from growing large enough to feel gritty.
Use unsalted butter so you can control the salt level precisely. A quarter teaspoon of salt might seem insignificant in 36 pieces of candy, but its impact is profound — salt enhances and focuses the chocolate flavor, making it taste more chocolatey without adding any perceptible saltiness.
The Process
Melting: Low and Slow
This is the only step that requires your attention, and even it is forgiving. Combine the chocolate chips, condensed milk, and butter in a heavy-bottomed saucepan over medium-low heat. Stir constantly — not because disaster is imminent, but because steady stirring ensures even melting and prevents any scorching on the bottom of the pan.
The mixture will start out thick and chunky, then gradually smooth out as the chocolate and butter melt into the condensed milk. After about 5 to 7 minutes, you will have a glossy, thick, smooth mixture that pulls away from the sides of the pan slightly. That is your cue that it is ready.
Do not let it boil. Bubbles mean the temperature is too high, and too much heat can cause the sugars to crystallize, producing grainy fudge. If you see bubbles, reduce the heat immediately and stir vigorously.
Adding Flavor and Texture
Remove the pan from the heat before adding vanilla and salt. The residual heat is plenty to incorporate them, and keeping vanilla away from direct heat preserves its delicate flavor. Stir them in thoroughly — you want the salt distributed evenly throughout rather than concentrated in spots.
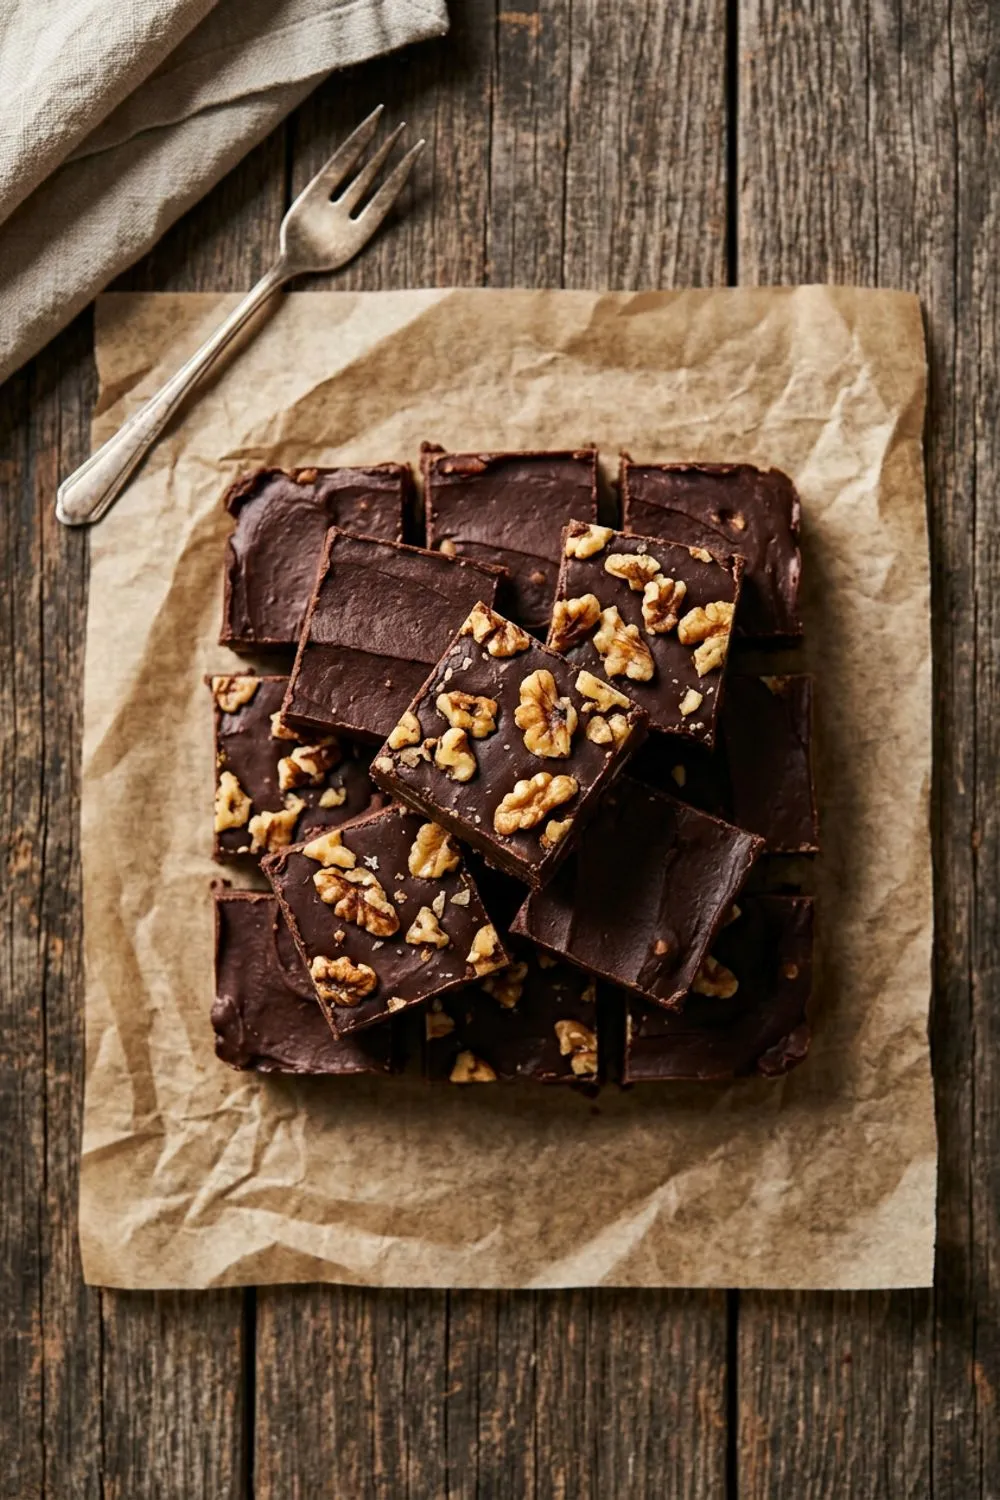
This is also the moment for add-ins. Toasted walnuts are my classic choice. The toasting is non-negotiable — raw walnuts in fudge taste flat and papery, while toasted walnuts add a rich, nutty crunch that elevates the entire experience. Toast them in a dry skillet over medium heat for about 5 minutes, stirring frequently, until fragrant and slightly darker.
Other add-ins I love: chopped pecans, dried tart cherries, crushed pretzels for a sweet-salty combination, or espresso beans for a mocha twist. Keep the total add-in volume to about 1 cup maximum, or the fudge will not hold together properly.
Setting: Patience Pays Off
Pour the fudge into the prepared pan and spread it evenly. Work quickly here — the mixture starts to firm up as it cools, and hesitation leads to an uneven surface. An offset spatula is the best tool, but the back of a spoon works fine.
If you are topping the fudge with flaky sea salt — which I strongly recommend — sprinkle it on now while the surface is still tacky. A light touch is important. You want just enough salt to provide occasional bursts of flavor, not a crust. About 1/2 teaspoon of flaky Maldon salt over the entire pan is perfect.
The fudge needs at least 2 hours in the refrigerator to set completely. You can speed this up in the freezer if needed — 45 minutes will get you there. But refrigerator setting is gentler and produces a slightly smoother final texture.
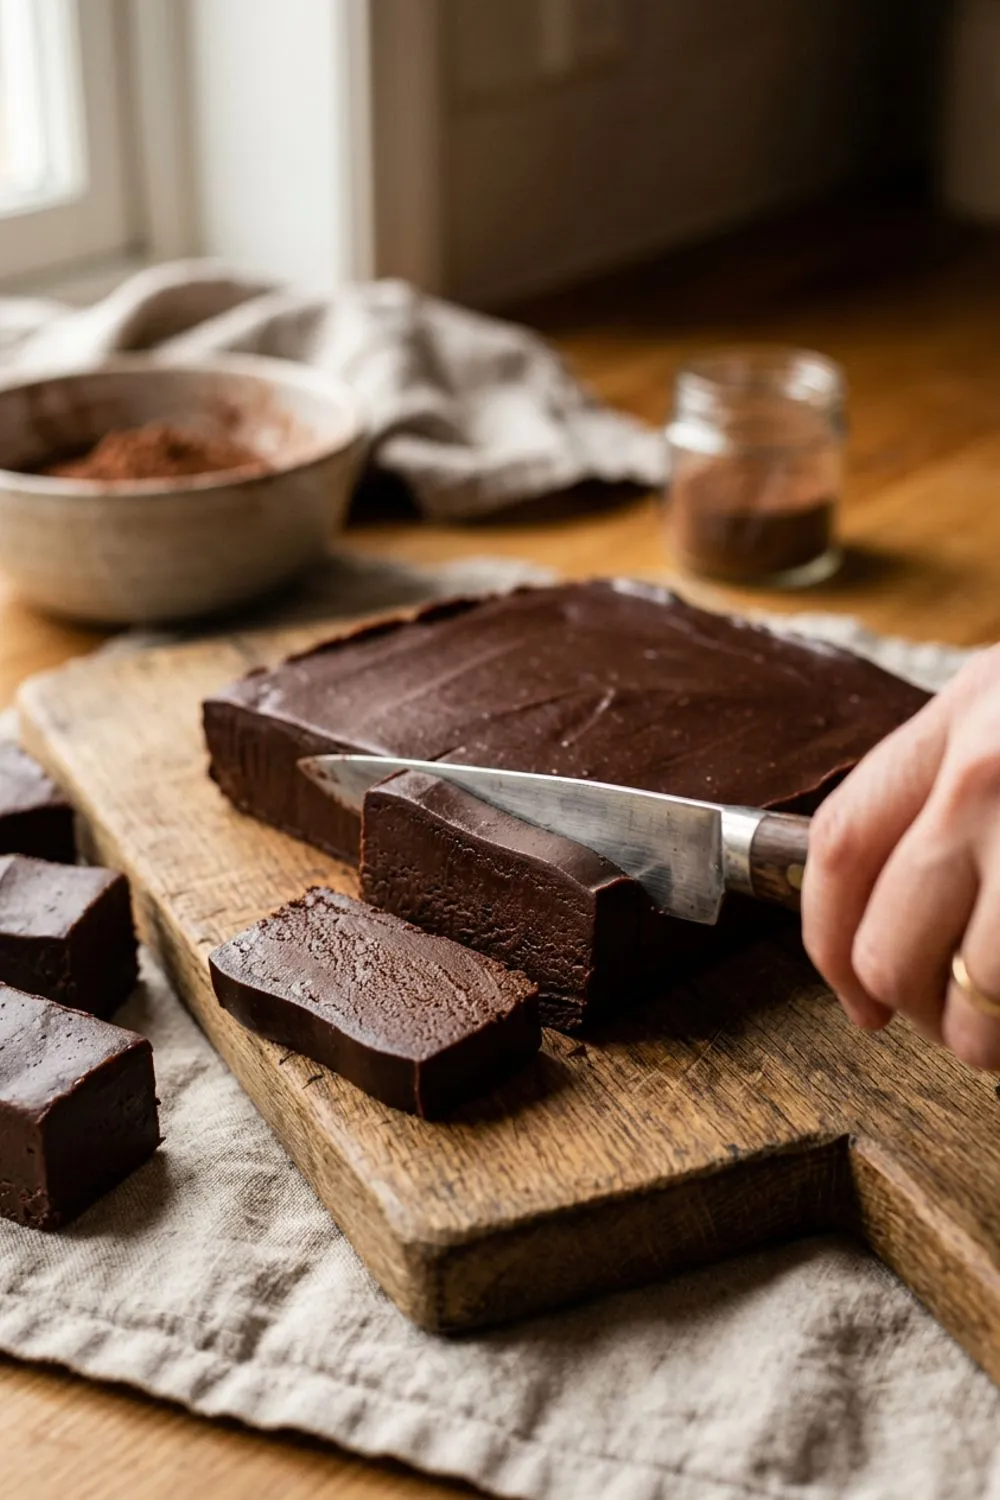
Cutting Beautiful Squares
The parchment overhang is your best friend here. Lift the entire block of fudge out of the pan and place it on a cutting board. Use a large, sharp chef’s knife for the cleanest cuts. Wipe the blade with a warm, damp cloth between cuts to prevent the fudge from sticking and dragging.
For uniform squares, make 5 cuts in each direction to create a 6x6 grid, yielding 36 pieces. If you prefer larger pieces, a 5x5 grid gives you 25, or a 4x4 grid gives you 16 generous squares. The knife should be pressed straight down through the fudge rather than dragged — a sawing motion creates ragged edges.
Flavor Variations
Peanut Butter Fudge
Stir 1/2 cup of creamy peanut butter into the chocolate mixture along with the vanilla. The peanut butter adds a salty-sweet depth that is utterly addictive. Use natural peanut butter for a less sweet version, or commercial for a sweeter, creamier one.
Rocky Road Fudge
Fold in 1/2 cup of mini marshmallows and 1/2 cup of toasted almonds after removing from the heat. The marshmallows stay soft and pillowy in the dense fudge, creating wonderful texture contrast.
Espresso Fudge
Dissolve 2 teaspoons of instant espresso powder into the mixture while it is still warm. The coffee flavor deepens the chocolate dramatically. Pair with my chocolate ganache for a mocha-themed dessert plate.
Maple Walnut Fudge
Replace the vanilla with 1 tablespoon of pure maple extract and fold in 1 cup of toasted walnuts. Top with flaky salt. This tastes like a Vermont autumn.
Gifting Fudge
Fudge is one of the best foods you can give as a gift. It is shelf-stable, travels well, looks beautiful, and everyone loves it. Cut the fudge into neat squares and layer them in a small box or tin with wax paper between layers. Tie with ribbon and include a label listing the ingredients for allergy awareness.
For an impressive holiday gift box, combine fudge with chocolate truffles and a few chocolate covered strawberries if the recipient will enjoy them quickly. The combination of textures and chocolate experiences makes for a memorable present.
Storage
At room temperature: In an airtight container for up to 1 week. The fudge will be soft and creamy at room temperature, which is the ideal serving texture.
In the refrigerator: In an airtight container for up to 3 weeks. The fudge will be firmer when cold. Let it sit at room temperature for 10 to 15 minutes before serving for the best texture.
In the freezer: Wrap individual pieces or the entire block tightly in plastic wrap, then foil, and freeze for up to 3 months. Thaw in the refrigerator overnight.
Common Questions About Fudge Texture
People often ask me why their fudge turned out differently than expected, and the answer almost always relates to temperature control or timing during the melting step.
Why is my fudge too soft? The mixture was not heated long enough. The chocolate and condensed milk need to reach a point where they are fully combined and the mixture is thick enough to pull away from the sides of the pan slightly. If you pour it into the pan while it is still thin and loose, it will not set firmly enough to slice into clean squares. Give it another minute or two on the heat, stirring constantly.
Why is my fudge too hard and dry? The heat was too high or the mixture was cooked for too long. Overheating drives off moisture and can cause the sugars to crystallize, producing a grainy, crumbly fudge that breaks apart rather than having that smooth, creamy melt. Keep the heat at medium-low and remove the pan from the heat as soon as the mixture is smooth and thick.
Why does my fudge have a chalky texture? The chocolate was not fully melted before the mixture was poured. Small pieces of unmelted chocolate can remain if you do not stir thoroughly enough or if you rush the process. They set into hard, grainy bits in the finished fudge. Take your time during the melting step and make sure the mixture is completely, uniformly smooth before adding vanilla and salt.
Why did my fudge develop white streaks on the surface? This is bloom — cocoa butter that has migrated to the surface during temperature fluctuations. It is cosmetic only and does not affect flavor or safety. To prevent it, store fudge at a consistent temperature and avoid moving it between warm and cold environments.
A Note on Simplicity
I know some bakers might read this recipe and wonder if fudge made with condensed milk is “real” fudge. The purist in me understands the question — traditional cooked fudge has a slightly different texture and a more complex, almost caramelized flavor. But the pragmatist in me answers: if it tastes like fudge, has the texture of fudge, and makes people as happy as fudge does, then it is fudge. And this version happens to be virtually foolproof, which means you will actually make it instead of just thinking about making it, and that counts for a lot.
Making Fudge with Kids
Fudge is one of the best recipes to make with children because it requires very few ingredients, the process is visual and engaging, and the result feels like a real accomplishment. There are a few safety adjustments to keep in mind.
The stovetop melting step involves hot chocolate and should be handled by an adult, but kids can measure and add the chocolate chips and butter to the pan before it goes on the heat. They can also stir the mixture under supervision once it is warm but not bubbling.
Adding vanilla, salt, and mix-ins is the perfect kid-friendly step — no heat required, and there is satisfaction in stirring chunky walnuts or colorful sprinkles into the glossy chocolate. Pouring the fudge into the pan and smoothing it out is another good task for small hands, though the mixture will be warm, so guide them accordingly.
Cutting the fudge is an adult job because of the sharp knife, but kids love choosing how many squares to make and can help arrange the pieces in gift boxes or on plates. The finished fudge makes an excellent project for a rainy afternoon, especially during the holiday season when gifts are on everyone’s mind.
Never Miss a Sweet Recipe
Join 5,000+ home bakers and get new recipes straight to your inbox.
Ingredients
Fudge
Optional Add-ins
Instructions
- 1
Prepare the Pan
Line an 8x8-inch (20x20cm) baking pan with parchment paper or aluminum foil, leaving a 2-inch overhang on all sides for easy removal. Lightly grease the lining with butter or cooking spray.
- 2
Melt the Chocolate Mixture
Combine the chocolate chips, sweetened condensed milk, and butter in a medium heavy-bottomed saucepan over medium-low heat. Stir constantly with a silicone spatula or wooden spoon until the chocolate and butter are completely melted and the mixture is smooth and thick, about 5–7 minutes. Do not let it boil.
- 3
Add Flavorings
Remove the saucepan from the heat. Stir in the vanilla extract and salt until well combined. If adding nuts or dried fruit, fold them in now, reserving a few pieces for topping if desired.
- 4
Pour and Smooth
Pour the fudge mixture into the prepared pan. Use an offset spatula or the back of a spoon to spread it evenly into the corners. Work quickly — the fudge starts to set as it cools. If topping with flaky sea salt, walnuts, or other garnishes, add them now while the surface is still slightly warm and tacky.
- 5
Cool and Set
Let the fudge cool at room temperature for 30 minutes, then transfer to the refrigerator for at least 2 hours until completely firm. The fudge should feel solid when pressed gently — no give or softness in the center.
- 6
Cut and Serve
Lift the fudge from the pan using the parchment overhang. Place on a cutting board and use a large, sharp knife to cut into 36 squares (6 rows by 6 rows). For clean cuts, wipe the knife between slices with a warm, damp cloth. Serve at room temperature for the creamiest texture.
Nutrition Information
Per serving (serves 36). Values are approximate.
| Calories | 135 calories |
| Total Fat | 7g |
| Saturated Fat | 4g |
| Carbohydrates | 17g |
| Sugar | 15g |
| Protein | 2g |
| Sodium | 45mg |
| Fiber | 1g |
* Percent Daily Values are based on a 2,000 calorie diet. Your daily values may be higher or lower depending on your calorie needs. Nutritional information is an estimate and may vary.
Frequently Asked Questions
Why is my fudge grainy instead of smooth?
The heat was likely too high, which can cause the sugar in the condensed milk to crystallize. Always melt over medium-low heat and stir constantly. If the mixture starts to bubble, it is too hot — reduce the heat immediately.
Can I use dark chocolate instead of semi-sweet?
Yes. Dark chocolate produces a more intense, slightly bitter fudge that is wonderful for adults who prefer less sweetness. Use chocolate in the 60 to 70 percent cacao range. Milk chocolate also works for a sweeter, milder fudge.
How long does homemade fudge last?
Stored in an airtight container, fudge keeps at room temperature for about 1 week, in the refrigerator for 2 to 3 weeks, and in the freezer for up to 3 months.
Can I double this recipe?
Yes, use a 9x13-inch pan and double all ingredients. The melting time will be slightly longer. You can also make half a batch in a loaf pan for a smaller quantity.

Reader Reviews
Based on 198 reviews