Holiday & Seasonal
Christmas Sugar Cookies
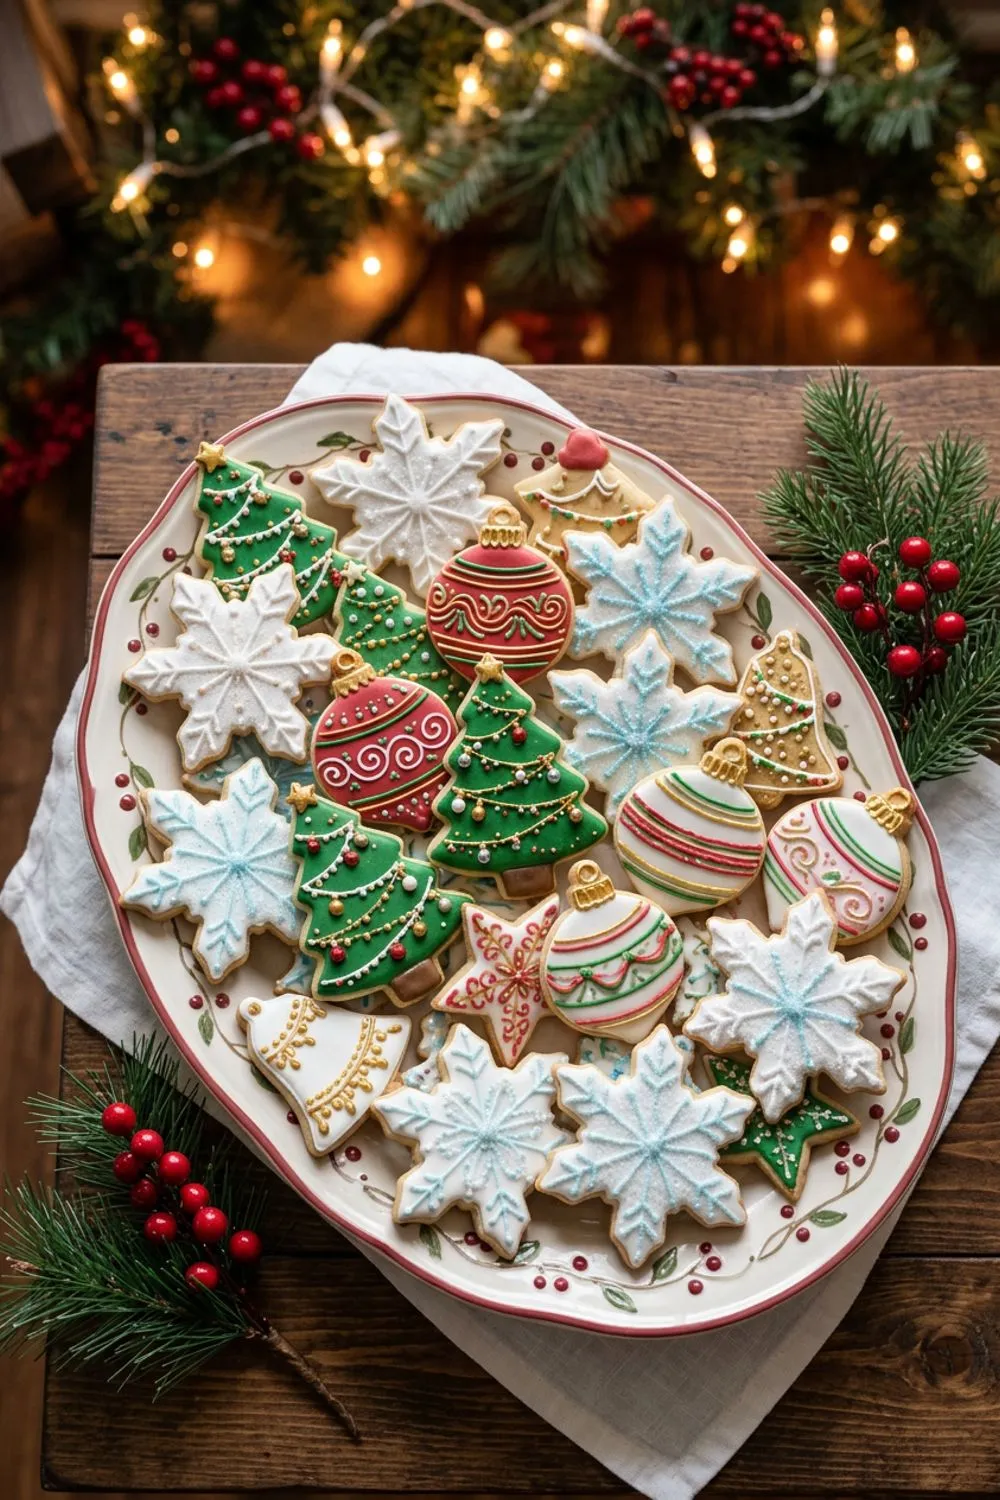
Why You’ll Love These Christmas Sugar Cookies
If there is one recipe that defines the holiday baking season for me, it is this one. Christmas sugar cookies are not just cookies — they are an event. They are the flour-dusted countertops, the battle over who gets to use the star-shaped cutter, the tiny tubes of icing lined up like a painter’s palette, and the hours spent at the kitchen table turning plain rounds of dough into miniature works of edible art. These cookies are as much about the experience of making them as they are about eating them.
But let me be clear: these cookies also taste incredible. I have encountered far too many decorated sugar cookies that look beautiful in photos but taste like sweetened cardboard. This recipe is not that. The dough is buttery and rich, with a soft vanilla-almond flavor that is genuinely delicious on its own — no icing required. The texture walks a perfect line between tender and crisp, with just enough structure to serve as a solid canvas for decorating without being hard or dry.
I spent years chasing this exact combination. Early versions of my sugar cookies spread too much, puffed up too thick, or tasted bland. The turning point came when I added almond extract to the dough. Just half a teaspoon transformed the flavor from generic sweet cookie to something special and almost addictive. If you have never added almond extract to sugar cookies before, prepare to be amazed. It does not make the cookies taste like almonds — it amplifies the butter and vanilla flavors in a way that is hard to explain until you taste it.
Building the Perfect Sugar Cookie Dough
The foundation of great cut-out cookies is a dough that is easy to work with and holds its shape flawlessly. This dough accomplishes both because of a few deliberate choices in the recipe.
First, I use a relatively high ratio of flour to butter. This is not a cookie that spreads into thin, crispy rounds — it is a cookie that stays exactly where you put it, maintaining every detail of your cookie cutter from the points of a star to the fingers of a gingerbread man. The baking powder provides just enough lift to keep the cookies tender without causing puffiness that obscures the shape.
Second, there is only one egg. Many sugar cookie recipes call for two eggs or even an egg plus a yolk, but I find that extra egg makes the dough too soft and the cookies too cakey. One egg provides the structure and moisture you need while keeping the texture crisp and the dough manageable.
Third, the creaming step matters more than you might think. Beating the butter and sugar together for a full three minutes incorporates air into the dough, which translates to a lighter, more tender cookie. Do not rush this step. The mixture should look pale, fluffy, and noticeably increased in volume before you add the egg.
And finally, the chilling. I cannot emphasize this enough. Cold dough rolls smoothly, cuts cleanly, and bakes into cookies that look exactly like the shapes you cut. Warm dough sticks to everything, tears when you try to lift cut shapes, and spreads in the oven. Give it a full hour in the refrigerator. If you are planning a decorating party, make the dough the night before and refrigerate it overnight. It only gets easier to work with as it rests.
Rolling and Cutting Like a Pro
When you are ready to roll, pull one disc of dough from the refrigerator and let it sit at room temperature for about five minutes — just long enough to become pliable without getting soft. If the dough cracks when you start rolling, it is too cold. If it sticks to the rolling pin, it is too warm.

Flour your surface lightly and evenly. I use a bench scraper to periodically slide under the dough and make sure it is not sticking. Roll to a quarter-inch thickness for the best balance of structure and tenderness. Thinner cookies will be crispier and more fragile; thicker ones will be softer but may not show fine details as well.
Dip your cookie cutters in flour before each cut to prevent sticking. Press straight down and lift straight up — do not twist the cutter, as this can seal the edges and prevent the cookies from rising evenly. Cut shapes as close together as possible to minimize scraps.
Here is a tip I wish someone had told me years ago: you can re-roll the scraps, but only once. Each time you re-roll, you are working more gluten into the dough, which makes the cookies tougher. Gather your scraps, press them together gently, chill briefly, and roll one more time. Any scraps after that second roll, I just bake as irregular shapes for the family to snack on.
Transfer cut shapes to parchment-lined baking sheets using a thin spatula. If the dough has become too warm and the shapes are distorting when you move them, slide the entire cutting board into the freezer for ten minutes, then try again.
Baking for Perfection, Not Color
The single biggest mistake people make with sugar cookies is overbaking them. I know it is tempting to leave them in until they turn golden brown all over, but golden brown sugar cookies are overbaked sugar cookies. They will be hard and dry instead of tender and crisp.
What you want is cookies that are barely golden at the very edges with centers that still look pale and slightly underdone. They will feel soft when you press them, and that is okay. They firm up considerably as they cool. Pull them at the eight-minute mark, check them, and only leave them for another minute or two if the edges truly look raw.
Use the middle rack of your oven and bake one sheet at a time for the most even results. If you need to bake multiple sheets, rotate them halfway through. And please, use an oven thermometer. I discovered that my oven runs 15 degrees hot, which was the explanation for years of slightly overbaked cookies.
Mastering Royal Icing
Royal icing is the traditional choice for decorated sugar cookies because it dries hard, holds its shape, and can be tinted any color imaginable. The meringue powder-based version I use here is food-safe, shelf-stable, and significantly easier to work with than raw egg white icing.
The consistency of your icing determines everything. You need two consistencies from the same batch: a stiff piping icing for outlines and details, and a thinner flooding icing for filling in large areas. Start with the stiff version — it should hold peaks that stand straight up without drooping. To make the flood version, scoop some icing into a separate bowl and thin it with water, a few drops at a time, until it flows like honey. Test it by drizzling a line across the surface. It should sink back and disappear within about ten seconds.
Gel food coloring is essential. Liquid food coloring adds too much moisture to the icing, which changes the consistency and makes the colors look washed out. Gel colors are concentrated, so you need only a tiny amount to achieve vibrant reds, greens, and blues. Start with less than you think you need — you can always add more.
The Decorating Process
Decorating sugar cookies is where the magic happens, and it is also where patience pays off enormously. The outline-and-flood method gives you the cleanest, most professional-looking results.
Pipe your outlines first using a small round piping tip, tracing the edge of each cookie with a steady hand. Do not worry about perfection — small wobbles will be hidden once the interior is flooded. Let the outlines dry for about ten minutes so they form a dam that holds the flood icing in place.
Fill a squeeze bottle or piping bag with your flood icing and squeeze it into the center of the outlined area. Use a toothpick to guide the icing into corners and along edges. Tap the cookie gently on the counter to settle the icing and pop any air bubbles. The surface should be smooth and self-leveling.
If you want to add details while the icing is wet — like polka dots, stripes, or marbled effects — do it immediately. Drop dots of a contrasting color onto the wet base and drag a toothpick through them for beautiful designs. For raised details that sit on top of the base color, wait until the first layer is completely dry, which takes four to six hours or overnight.
Variations and Festive Ideas
Marbled cookies: Flood two or three colors onto a cookie at the same time and swirl with a toothpick for a stunning marbled effect. Red, white, and green look especially festive.
Sparkle cookies: While the flood icing is still wet, dust with edible glitter or sanding sugar for cookies that catch the light. These are show-stoppers on a holiday platter.
Citrus sugar cookies: Add the zest of one lemon or orange to the dough for a bright, fragrant twist. Pair with a simple glaze instead of royal icing for a less formal look. For another holiday classic, try my gingerbread cookies.
Cinnamon sugar cookies: Roll the scraps in cinnamon sugar and bake as-is for a quick snack cookie that requires no decorating. My kids love these even more than the decorated ones.
How to Store Christmas Sugar Cookies
Undecorated cookies: Store in an airtight container at room temperature for up to one week, or freeze for up to three months. Thaw at room temperature before decorating.
Decorated cookies: Once the icing is completely dry, layer cookies between sheets of parchment or wax paper in an airtight container. They will keep at room temperature for two to three weeks.
Cookie dough: Wrapped discs of dough keep in the refrigerator for up to three days or in the freezer for up to three months. You can also cut shapes, freeze them on a baking sheet until solid, and store in freezer bags for up to three months. Bake from frozen, adding one to two extra minutes.
Troubleshooting Common Issues
Cookies losing their shape: The dough was too warm when it went into the oven. Even five extra minutes at room temperature can make the difference between cookies that hold their shape and cookies that spread into blobs. If the dough feels soft while you are cutting, slide the entire sheet of cut shapes into the freezer for ten minutes before baking. This firms the butter back up and guarantees sharp edges.
Cookies are too hard or dry: They were overbaked. Sugar cookies go from perfect to overdone very quickly. Pull them when the very edges are barely golden and the centers still look pale and slightly soft. They will firm up considerably as they cool on the baking sheet. If you consistently overbake, reduce your oven temperature by fifteen degrees and extend the baking time by one minute.
Royal icing is too thick to flood: Add water by the half-teaspoon until the icing flows smoothly. Test it by drizzling a line across the surface — it should disappear within ten seconds. If you accidentally thin it too much, add a tablespoon of powdered sugar and beat again.
Royal icing is not drying: Humidity is the most common culprit. On humid days, royal icing can take twice as long to set. Speed up the process by placing decorated cookies in front of a small fan or in an oven that has been heated to 175 degrees Fahrenheit and then turned off. The gentle warmth helps evaporate moisture from the icing.
Colors bleeding into each other: The borders between different colored icing sections were not dry enough before you added the adjacent color. Let each section dry for at least fifteen minutes before piping a different color next to it. For particularly detailed designs, work in stages over several hours rather than trying to complete everything at once.
Planning a Cookie Decorating Party
Christmas sugar cookies are the perfect centerpiece for a holiday decorating party, and with a little advance planning, you can host one without losing your mind. Make the dough and bake all the cookies two to three days ahead. Store them in airtight containers — undecorated cookies actually improve slightly as they rest.
The day of the party, prepare a large batch of royal icing and divide it into small bowls, tinting each a different color. Set out piping bags, toothpicks, and an assortment of sprinkles and decorations. Cover a table with a disposable tablecloth for easy cleanup, and give each guest a plate of cookies and access to the decorating station.
A couple of practical tips: provide damp paper towels for sticky fingers, have extra piping bags ready because tips get clogged, and set the icing bowls on damp towels to keep them from sliding around. Play holiday music, pour some cocoa, and let people create. The cookies people take home become the best party favors.
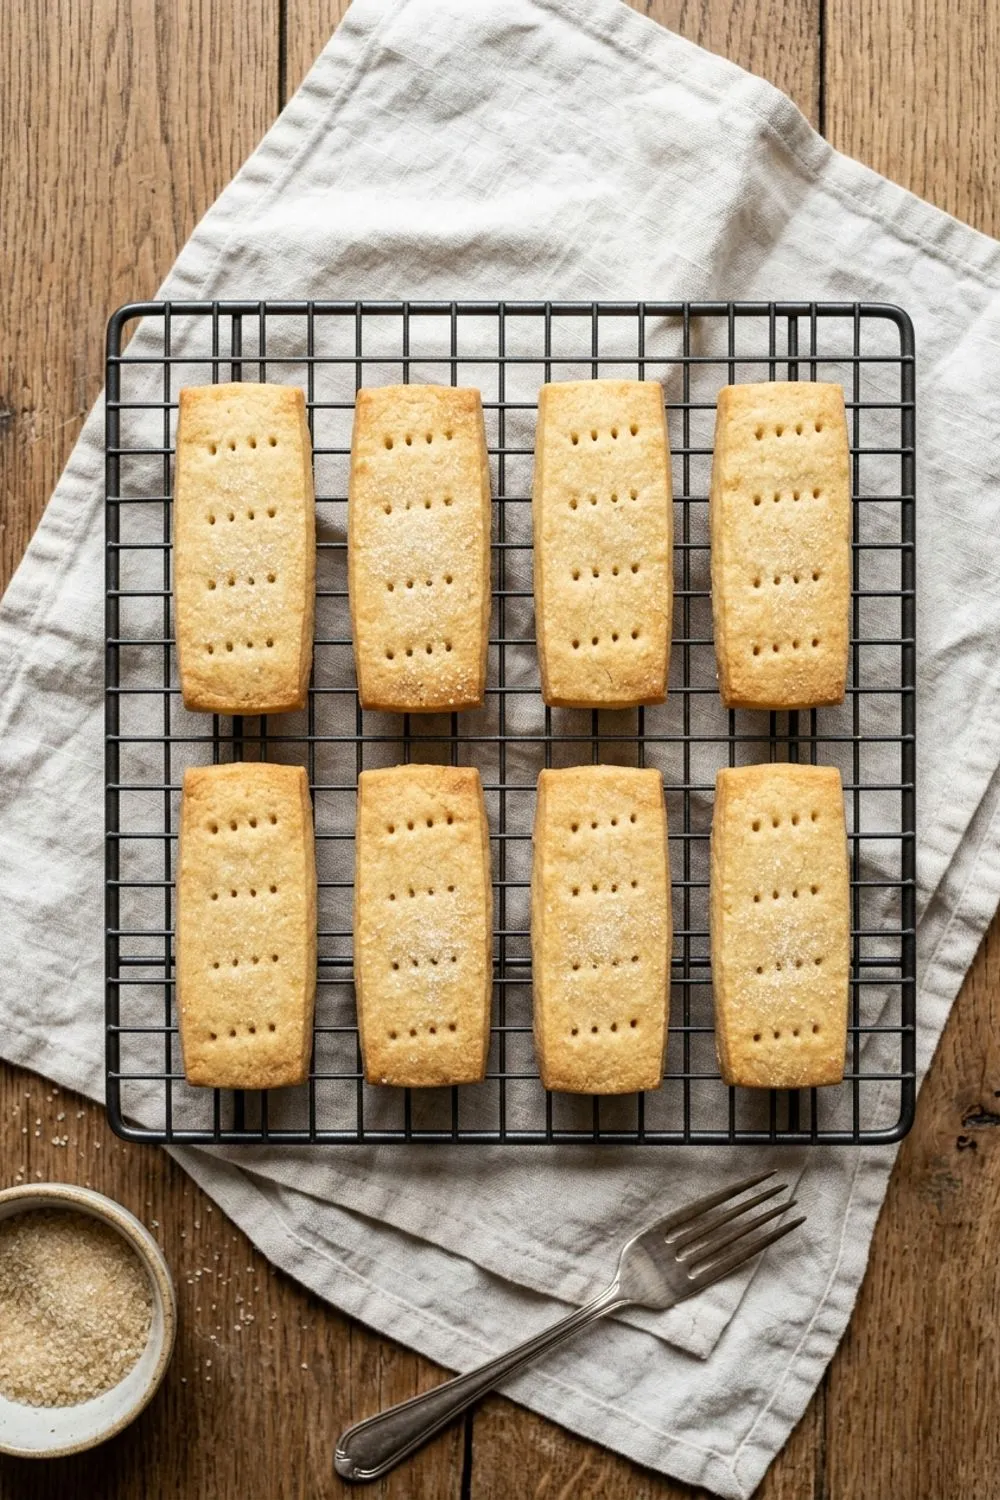
These cookies pair wonderfully with my shortbread cookies for a gift box that covers both decorated and buttery classic styles. Whether you are making them for a party, packaging them as gifts, or just enjoying a quiet afternoon of decorating by yourself, these Christmas sugar cookies are worth every minute of the effort.
Never Miss a Sweet Recipe
Join 5,000+ home bakers and get new recipes straight to your inbox.
Ingredients
Sugar Cookie Dough
Royal Icing
Decorations
Instructions
- 1
Make the Cookie Dough
In a medium bowl, whisk together flour, baking powder, and salt. In a stand mixer with the paddle attachment, cream butter and sugar on medium speed for 3 minutes until light and fluffy. Beat in the egg, vanilla, and almond extract. Gradually add dry ingredients on low speed until just combined.
- 2
Chill the Dough
Divide dough in half and shape each portion into a flat disc. Wrap tightly in plastic wrap and refrigerate for at least 1 hour (or up to 3 days). The dough must be cold to hold its shape during cutting.
- 3
Roll and Cut Shapes
Preheat oven to 350°F (175°C). On a lightly floured surface, roll dough to 1/4-inch (6mm) thickness. Cut shapes with cookie cutters and place on parchment-lined baking sheets, spacing 1 inch apart. Re-roll scraps once, chilling briefly if dough becomes soft.
- 4
Bake
Bake for 8-10 minutes until edges are barely golden — centers should look slightly underdone. Do not overbake. Cool on the baking sheet for 5 minutes, then transfer to a wire rack to cool completely before decorating.
- 5
Prepare the Royal Icing
In a stand mixer fitted with the whisk attachment, combine sifted powdered sugar and meringue powder. Add 6 tablespoons warm water. Beat on low until combined, then increase to medium-high for 5-7 minutes until stiff, glossy peaks form. Add water by the teaspoon if too thick.
- 6
Prepare Icing Consistencies
For outlining (piping consistency), the icing should hold a stiff peak. For flooding (filling in), thin a portion with water until it flows like honey — a drizzled line should disappear into the surface within 10 seconds. Divide and tint with gel food coloring.
- 7
Decorate the Cookies
Pipe outlines with stiff icing using a small round tip. Let set 10 minutes. Flood interiors with thinned icing, using a toothpick to spread into corners. Add sprinkles, details, and second colors while wet. Let dry completely, 4-6 hours or overnight, before stacking.
Nutrition Information
Per serving (serves 36). Values are approximate.
| Calories | 150 calories |
| Total Fat | 6g |
| Saturated Fat | 3.5g |
| Carbohydrates | 23g |
| Sugar | 14g |
| Protein | 1.5g |
| Sodium | 55mg |
| Fiber | 0.2g |
* Percent Daily Values are based on a 2,000 calorie diet. Your daily values may be higher or lower depending on your calorie needs. Nutritional information is an estimate and may vary.
Frequently Asked Questions
Why do my sugar cookies lose their shape when baking?
The dough was too warm. Always chill for at least 1 hour, and if the dough feels soft while cutting, pop the sheet in the freezer for 10 minutes before baking.
Can I make the dough and freeze it?
Yes! Wrap discs tightly and freeze for up to 3 months. You can also cut shapes, freeze on a sheet, then store in bags and bake from frozen — just add 1-2 minutes to the bake time.
How far in advance can I decorate Christmas sugar cookies?
Decorated cookies stored in airtight containers between parchment layers will stay fresh for up to 2 weeks at room temperature.
What if I do not have meringue powder for the icing?
You can substitute 2 pasteurized egg whites for the meringue powder, but the icing will take longer to dry and may not be quite as sturdy.

Reader Reviews
Based on 256 reviews