Holiday & Seasonal
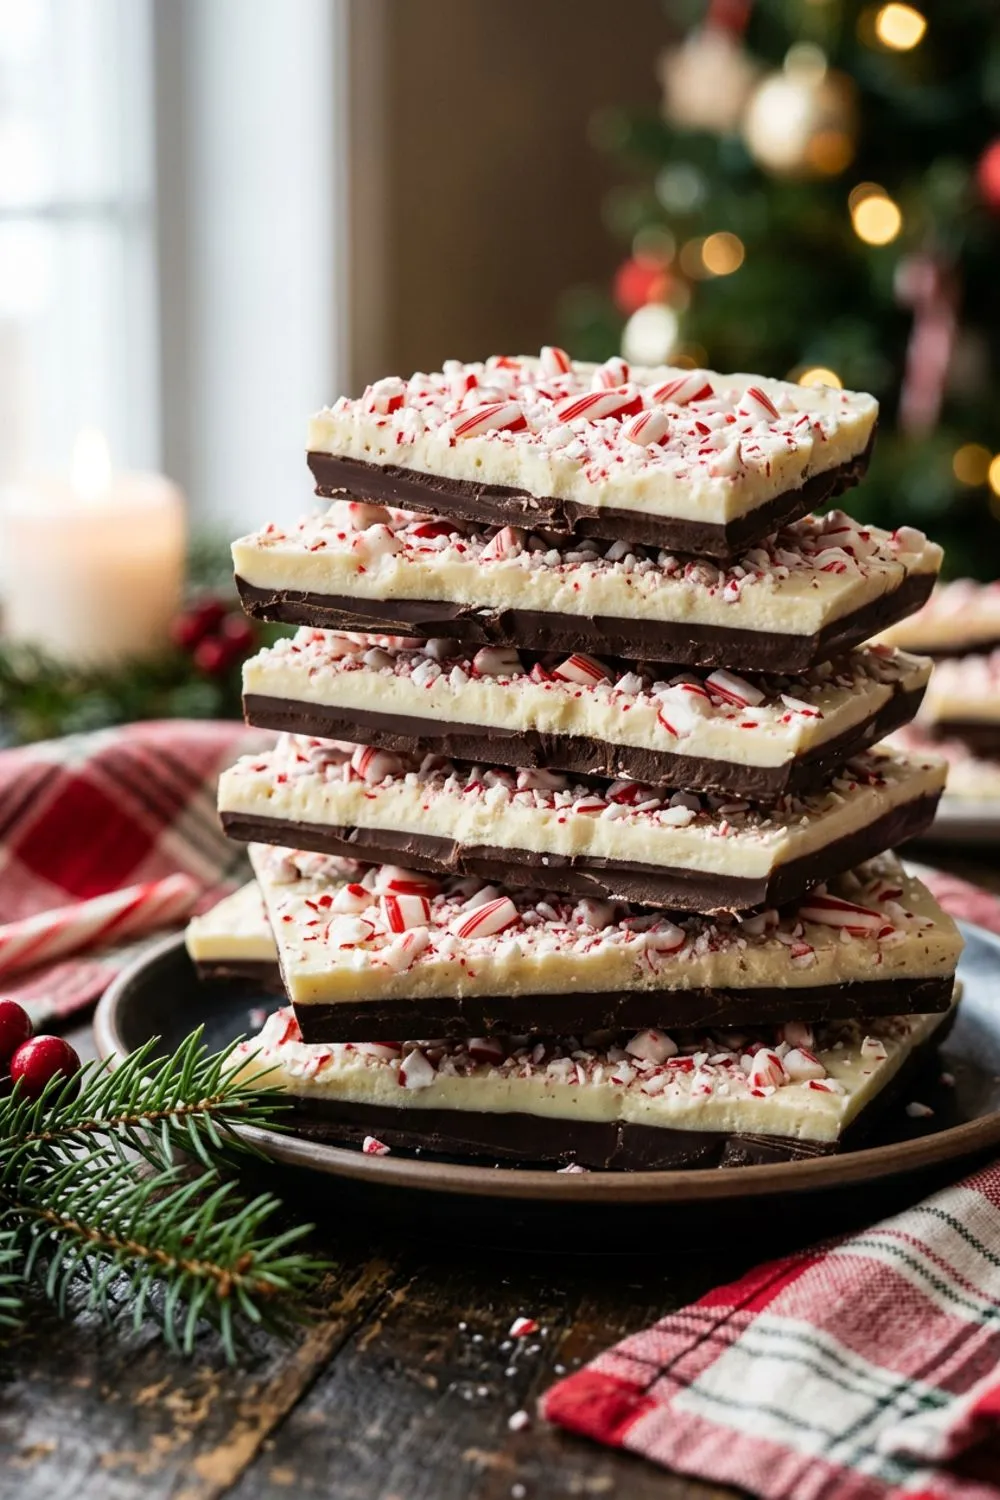
Peppermint Bark

Why You’ll Love This Peppermint Bark
Every holiday season, without fail, someone asks me what my favorite homemade gift to give is. The answer has not changed in years: peppermint bark. It is one of those magical recipes that looks like it came from an expensive candy shop, tastes absolutely incredible, and takes almost no effort to put together. If you can melt chocolate, you can make peppermint bark. That is really all there is to it.
I started making peppermint bark about twelve years ago when I was looking for a simple holiday treat to bring to my office party. I had never made candy before and was intimidated by anything that involved a candy thermometer. When I discovered that peppermint bark was essentially just melted chocolate spread in layers, I was skeptical that something so easy could taste that good. But from the very first batch, I was hooked — and so was everyone at that party. I came home to an empty container and a stack of requests for the recipe.
What makes this version stand out is the combination of high-quality chocolate and just the right amount of peppermint. I have seen recipes that use way too much peppermint extract, turning the bark into something that tastes like toothpaste. I have also tried versions that skimp on the candy cane topping, which defeats the whole purpose. This recipe gets both elements right, and the result is a bark that has the perfect balance of rich chocolate depth and bright, cool peppermint.
Choosing the Right Chocolate
The quality of your chocolate matters enormously in this recipe because chocolate is essentially the entire thing. There are no eggs, flour, or butter to hide behind — just chocolate, a touch of oil, and peppermint. So this is the time to reach for the good stuff.
For the dark chocolate layer, I recommend something in the 60 to 70 percent cacao range. This gives you a deep, satisfying chocolate flavor that balances the sweetness of the white chocolate on top. If you go much darker than 70 percent, the bark can taste slightly bitter, which some people love but others find off-putting, especially kids. My personal favorite is a good-quality semisweet baking chocolate, which typically falls right around 60 percent cacao.
For the white chocolate, quality matters even more. Cheap white chocolate often contains palm oil or vegetable fats instead of cocoa butter, and the difference in both flavor and texture is dramatic. Look for white chocolate that lists cocoa butter as the first ingredient. It should taste creamy and vanilla-like, not waxy or overly sweet. This single upgrade will transform your peppermint bark from good to outstanding.
I add a teaspoon of coconut oil to each chocolate layer, and people always ask me why. The oil serves two purposes: it helps the chocolate melt more smoothly, reducing the chance of seizing or clumping, and it gives the finished bark a beautiful sheen and a satisfying snap when you break it apart. You will not taste the coconut at all — it simply makes the chocolate easier to work with and prettier to look at.
The Art of Melting Chocolate
Melting chocolate sounds simple, but it is actually where most peppermint bark mishaps occur. Chocolate is temperamental. It does not like high heat, it does not like moisture, and it does not like being rushed. Understanding these three things will save you from a lot of frustration.
I use the microwave method because it is faster and gives me more control than a double boiler. The key is patience: microwave in 30-second intervals, stirring thoroughly between each one. The chocolate will not look melted after the first couple of intervals, and that is fine. Keep stirring. A lot of the melting happens from residual heat, not from the microwave itself. By the time you hit about two minutes total, you should have a perfectly smooth, glossy pool of melted chocolate.
The most common mistake is overheating the chocolate. If dark chocolate gets too hot, it becomes thick and grainy — a condition called seizing. If white chocolate overheats, it can turn into an unworkable clump of chalky paste. Both are heartbreaking to deal with and usually cannot be fully rescued. The fix is prevention: keep your intervals short, stir well, and stop microwaving the moment the chocolate is smooth.
One more important note: make absolutely sure your bowls and spatulas are completely dry before they touch the chocolate. Even a tiny amount of water can cause chocolate to seize instantly. I always wipe my bowls with a paper towel before starting, just to be safe.
Layering for the Perfect Bark
The layering process is straightforward, but a couple of small details make a big difference in the final result. When you spread the dark chocolate layer onto your parchment-lined baking sheet, use an offset spatula and try to get it as even as possible. Thick spots will make the bark harder to break later, and thin spots may crack in the wrong places. Aim for about an eighth of an inch — thin enough to snap cleanly but thick enough to provide a satisfying chocolate presence.
The dark chocolate layer needs to be completely firm before you add the white chocolate on top. I refrigerate mine for 15 to 20 minutes, and I check it by pressing a fingertip to the surface. If it is hard and does not leave a mark, it is ready. If you add the white chocolate too soon, the two layers will meld together instead of remaining distinct, and you will lose that beautiful striped cross-section that makes peppermint bark so visually appealing.
When you pour the white chocolate over the dark layer, work quickly. White chocolate sets faster than dark chocolate, so you do not have a lot of time to fuss with it. Pour it all at once, then use your offset spatula to spread it in smooth, confident strokes. Do not go back and forth too many times or the white chocolate will start to set unevenly and you will get a rough, mottled surface.
Crushing the Candy Canes
This step sounds trivial, but there is actually a technique to it. I put the unwrapped candy canes in a zip-top bag, seal it mostly shut leaving a small opening for air to escape, and then crush them with a rolling pin. You want a mix of sizes — some fine, almost powdery pieces and some larger chunks about the size of peas. The fine pieces distribute the peppermint flavor evenly, while the larger chunks give you those satisfying bursts of crunch and color.
Do not crush them too far in advance. Crushed candy canes absorb moisture from the air and become sticky within an hour or two. Crush them right before you need them, or at most a few minutes ahead.
Sprinkle the crushed candy canes over the white chocolate layer immediately after spreading it, while the chocolate is still wet. Press them gently into the surface with your fingertips or the back of a spoon. If you wait too long and the white chocolate starts to set, the candy cane pieces will not stick and they will just fall off when you break the bark apart.
I also like to finish with a very light sprinkle of flaky sea salt. This is optional, but I think it elevates the bark significantly. The salt enhances the chocolate flavor and cuts through the sweetness, giving you a more complex, grown-up treat. Use flaky salt like Maldon, not fine table salt — you want delicate crystals that dissolve on your tongue.
Variations and Creative Twists
Triple chocolate bark: Add a thin layer of milk chocolate between the dark and white layers for an extra dimension of flavor. Let each layer set fully before adding the next.
Espresso peppermint bark: Stir a teaspoon of instant espresso powder into the dark chocolate as it melts. The coffee flavor is subtle but adds incredible depth. This version is especially popular with the adults at holiday parties.
Peppermint bark clusters: Instead of spreading the chocolate in flat layers, drop spoonfuls of mixed dark and white chocolate onto parchment paper, swirl with a toothpick, and top with candy cane pieces. These look beautiful in gift bags and are perfect if you do not have a large baking sheet.
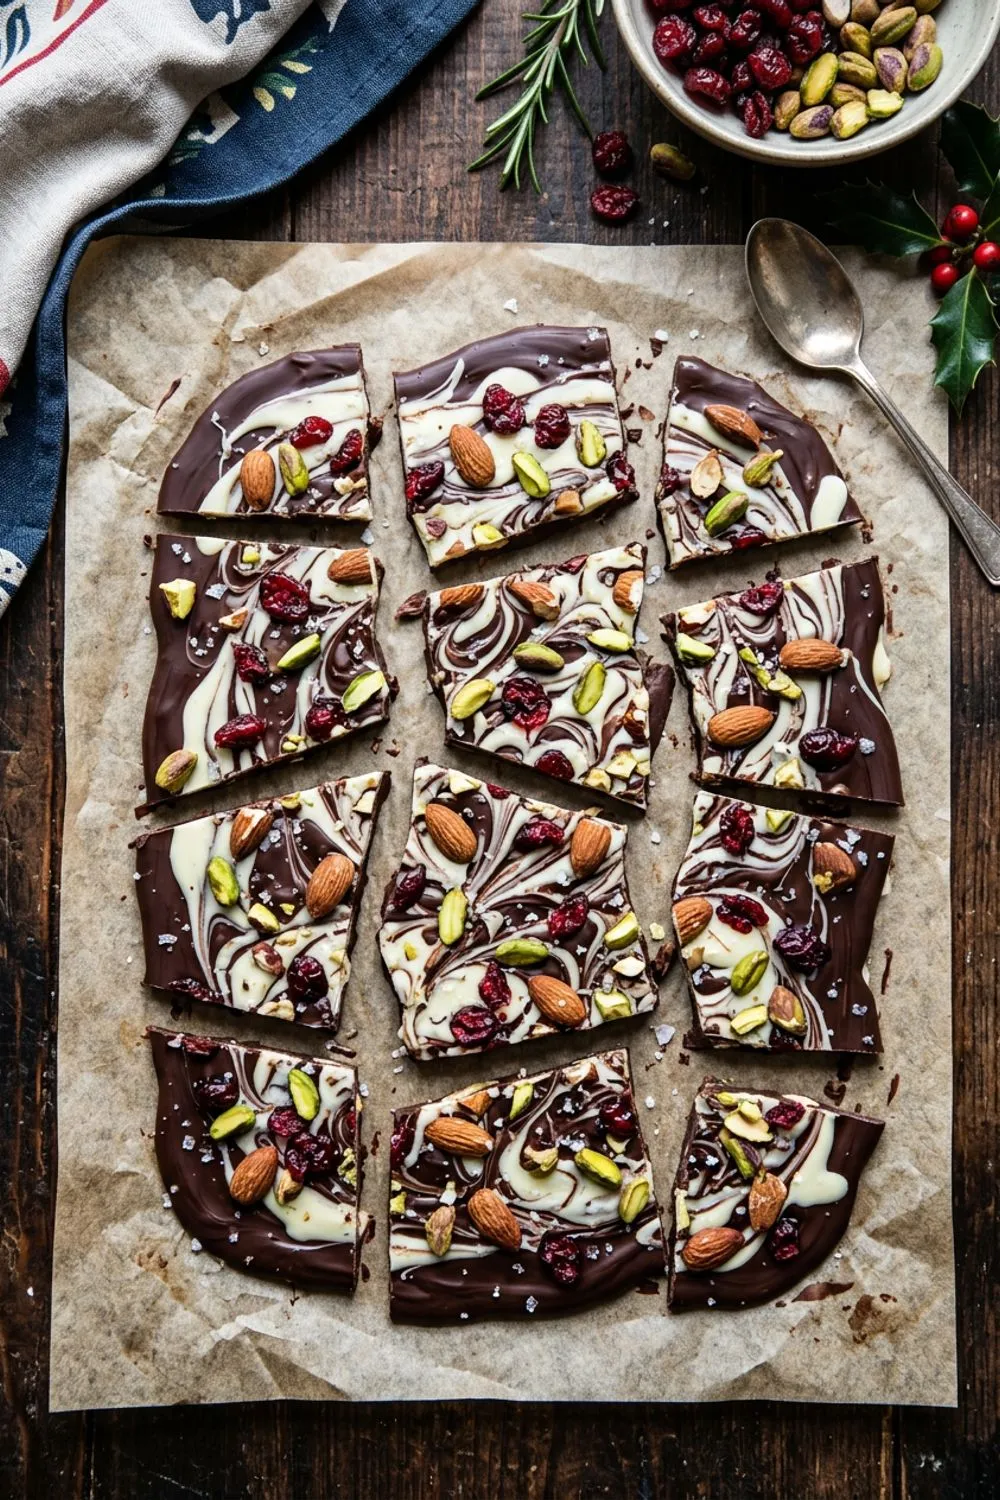
Matcha peppermint bark: Replace the white chocolate layer with melted white chocolate tinted with a tablespoon of culinary-grade matcha powder. The earthy matcha and cool peppermint are a surprisingly wonderful combination, and the green color is festive. For more chocolate ideas, try my chocolate bark with nuts and dried fruit.
Packaging Peppermint Bark as Gifts
One of the reasons I make peppermint bark every single December is that it makes an absolutely gorgeous homemade gift. Break the bark into pieces of varying sizes — imperfect, rustic shapes look more artisanal than precise squares. Layer the pieces in cellophane bags tied with ribbon, arrange them in decorative tins lined with tissue paper, or stack them in small boxes with a sheet of parchment between each layer.
I usually make a triple batch during the first week of December and package it up for teachers, neighbors, mail carriers, and anyone else on my holiday gift list. Each batch takes about 20 minutes of active time, and you can have three batches done in an afternoon. The bark keeps for weeks in the refrigerator, so there is no rush to distribute it all at once.
A nice touch is to print or handwrite a small card with the ingredient list. This is especially appreciated by anyone with food allergies, and it shows that extra bit of thoughtfulness that makes a homemade gift feel special.
How to Store Peppermint Bark
Room temperature: Peppermint bark can sit at room temperature for about a week if your house is cool (below 70 degrees Fahrenheit). In a warm kitchen, the chocolate will start to soften and the candy cane pieces may get sticky.
Refrigerator: This is my preferred storage method. Layer the bark between sheets of parchment or wax paper in an airtight container and refrigerate for up to three weeks. Let it come to room temperature for about five minutes before serving for the best texture and flavor.
Freezer: For longer storage, freeze the bark in airtight containers for up to two months. Thaw in the refrigerator rather than at room temperature to avoid condensation, which can make the surface cloudy.
Troubleshooting Your Peppermint Bark
Chocolate layers blending together: The dark chocolate layer was not fully set before you added the white chocolate. Next time, refrigerate until the dark layer is completely hard.
White chocolate looks grainy or lumpy: It was overheated. White chocolate is very sensitive and should never get above 110 degrees Fahrenheit. Use shorter microwave intervals and stir more frequently.
Candy cane pieces falling off: You waited too long to add them. The candy canes need to be pressed into wet chocolate. If some pieces fall off after the bark is set, you can attach them with a tiny dab of melted chocolate.
Bark is too thick to break easily: The layers were spread too thickly. Try using a larger baking sheet next time so the chocolate spreads thinner, or use a sharp knife to score the bark into pieces before it is fully set. You might also enjoy my chocolate covered strawberries for another elegant chocolate treat.
Making Peppermint Bark as a Group Activity
Peppermint bark is a wonderful recipe to make with friends or family because the steps are simple enough that everyone can participate. I have hosted peppermint bark making sessions where each person gets their own baking sheet and we all work through the steps together. Someone melts the dark chocolate while another person crushes candy canes. When the white chocolate goes on, everyone gathers around to sprinkle their own toppings.
For a more creative session, set out a variety of toppings beyond just candy canes — think crushed Oreos, chopped pistachios, dried cranberries, mini marshmallows, sprinkles, and edible glitter. Let each person customize their bark with whatever combination appeals to them. The variety of results is always delightful, and everyone goes home with a unique batch of bark.
Why This Recipe Deserves a Spot in Your Holiday Rotation
Making peppermint bark has become one of those traditions that signals the start of the holiday season in our house. It is the first thing I make in December, and the kitchen smells like chocolate and peppermint for the rest of the day. My kids hover around waiting for the scraps and broken pieces that do not make it into the gift packages, and there is always a container in the fridge for us to snack on throughout the month.
What I appreciate most about this recipe is how forgiving and adaptable it is. You do not need special equipment, you do not need advanced skills, and you can customize it endlessly. Swap the dark chocolate for milk chocolate. Use crushed peppermint hard candies instead of candy canes. Add some crushed Oreos to the white chocolate layer. The base technique stays the same, and the results are always impressive.
If you are looking for more holiday inspiration, my gingerbread cookies pair beautifully with peppermint bark on a holiday cookie platter or in a gift basket. Together they cover the chocolate and the spice, and they look stunning side by side.
Never Miss a Sweet Recipe
Join 5,000+ home bakers and get new recipes straight to your inbox.
Ingredients
Dark Chocolate Layer
White Chocolate Layer
Topping
Instructions
- 1
Prepare the Pan
Line a large rimmed baking sheet (approximately 13x18 inches) with parchment paper, ensuring the paper comes up the sides. Set aside.
- 2
Melt the Dark Chocolate
Place the chopped dark chocolate and 1 teaspoon coconut oil in a microwave-safe bowl. Microwave in 30-second intervals, stirring between each, until completely smooth (about 2 minutes total). Stir in 1/4 teaspoon peppermint extract.
- 3
Spread the First Layer
Pour the melted dark chocolate onto the prepared baking sheet and spread into an even layer using an offset spatula. The layer should be about 1/8-inch thick. Refrigerate for 15-20 minutes until completely firm to the touch.
- 4
Melt the White Chocolate
Place the chopped white chocolate and 1 teaspoon coconut oil in a clean microwave-safe bowl. Microwave in 30-second intervals, stirring between each, until smooth (about 1.5-2 minutes total). Be careful not to overheat. Stir in 1/2 teaspoon peppermint extract.
- 5
Add the White Chocolate Layer
Pour the melted white chocolate over the firm dark chocolate layer and spread evenly with an offset spatula. Work quickly before the white chocolate begins to set.
- 6
Add Toppings and Set
Immediately sprinkle the crushed candy canes evenly over the white chocolate layer, pressing them gently into the surface. Add a pinch of flaky sea salt if desired. Refrigerate for at least 1 hour until completely firm.
- 7
Break into Pieces
Remove from the refrigerator and let sit at room temperature for 2-3 minutes. Break or cut into irregular pieces, approximately 2 inches each. Serve or store in an airtight container.
Nutrition Information
Per serving (serves 24). Values are approximate.
| Calories | 135 calories |
| Total Fat | 8g |
| Saturated Fat | 5g |
| Carbohydrates | 16g |
| Sugar | 14g |
| Protein | 1.5g |
| Sodium | 15mg |
| Fiber | 0.5g |
* Percent Daily Values are based on a 2,000 calorie diet. Your daily values may be higher or lower depending on your calorie needs. Nutritional information is an estimate and may vary.
Frequently Asked Questions
Why did my white chocolate seize up?
White chocolate is very sensitive to heat. Always melt in short 30-second bursts and stir thoroughly between each. Even a drop of water can cause it to seize. If it does, try stirring in a teaspoon of coconut oil to smooth it out.
Can I use chocolate chips instead of chopped chocolate?
You can, but chopped bar chocolate melts more smoothly and produces a better snap. Chocolate chips contain stabilizers that can affect the texture.
How long does peppermint bark last?
Stored in an airtight container in the refrigerator, peppermint bark lasts up to 3 weeks. It can also be frozen for up to 2 months.
Can I use milk chocolate instead of dark?
Yes! Milk chocolate makes a sweeter, milder bark. Just reduce the peppermint extract slightly since the milk chocolate flavor is more delicate.

Reader Reviews
Based on 189 reviews